Sleeve
Set-in, raglan and kimono sleeves compared - the parts of a sleeve pattern, how cap height and ease affect fit and movement, and how to set in a sleeve without puckers.
Published · Updated

"Sleeve" covers several quite different construction problems, depending on how the sleeve joins the body of the garment. The three basic types, shown as pattern pieces below, are the set-in sleeve, the raglan sleeve, and the kimono (or dolman) sleeve. Most other sleeves (puffed, bishop, cap, bell, leg-of-mutton) are variations on the set-in sleeve, with fullness added or removed.
The three types
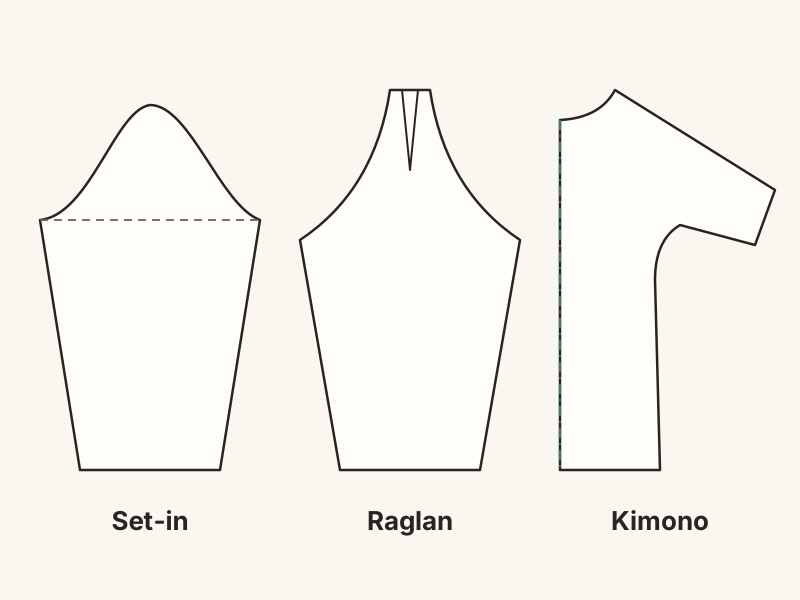
Set-in sleeves are cut separately and sewn into a round armhole (the armscye) at the shoulder. They're the most common sleeve on fitted garments and give the neatest, most tailored shoulder line. They're also the hardest to sew, because the sleeve cap is drafted larger than the armhole and has to be eased in without puckers.
Raglan sleeves extend all the way up to the neckline, with a diagonal seam running from the underarm to the neck instead of a shoulder seam and armhole. The shoulder is shaped by a dart or a seam running along the top of the arm. Raglans are comfortable, easy to fit across the shoulders, and simple to sew, which is why they're common on sportswear, knitwear and children's clothes.
Kimono and dolman sleeves are cut in one piece with the bodice, with no armhole seam at all. They're the simplest to sew. The trade-off is movement: when you raise your arm, the whole side of the garment lifts with it. A deep, close-fitting kimono sleeve usually needs an underarm gusset, a small diamond or triangle of fabric set into the underarm seam, to allow the arm to move.
The parts of a set-in sleeve
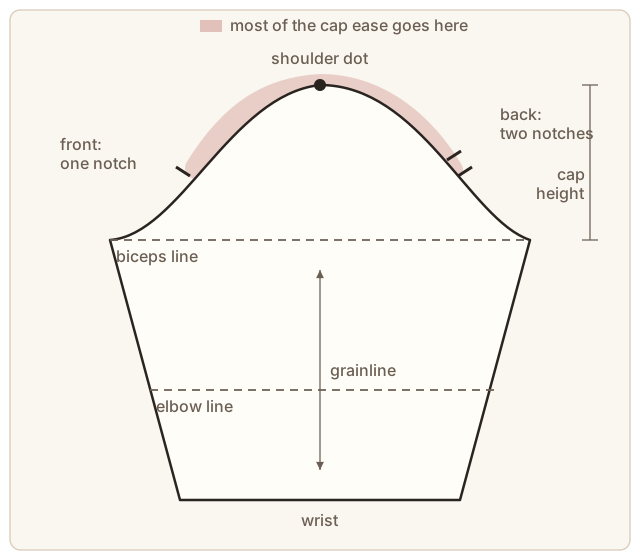
- Cap: the curved top that fits into the armhole.
- Shoulder dot: marks the top of the cap, matched to the shoulder seam.
- Notches: a single notch on the front of the cap and a double notch on the back. These are a near-universal convention, and they're how you tell a left sleeve from a right.
- Biceps line: the line across the widest part of the sleeve, from underarm to underarm.
- Cap height: the distance from the biceps line up to the shoulder dot.
- Elbow line: shows where an elbow dart or extra length for bending goes.
- Grainline: runs from the shoulder dot straight down the centre of the sleeve.
Cap height and movement
A sleeve's cap height controls a trade-off between a smooth look and freedom of movement:
- A tall cap with a narrow sleeve hangs smoothly when the arm is down and looks tailored, but it restricts lifting the arm. This is the cap of a fitted jacket or a formal dress.
- A short, flat cap with a wider sleeve lets the arm lift freely, but it forms folds under the arm when the arm is down. This is the cap of a shirt, a sweatshirt or workwear.
So if a sleeve looks perfect but you can't raise your arms in it, the cap is too tall for the garment's purpose. If it moves easily but has drag lines and folds at rest, that's normal for a low cap.
How much ease is in the cap
The cap seam is drafted longer than the armhole seam so the sleeve can curve over the top of the shoulder. Typical amounts:
| Garment | Typical cap ease |
|---|---|
| Shirts sewn flat, knits | 0-1/2" (0-1.3 cm) |
| Blouses and dresses in woven fabric | about 1-1 1/2" (2.5-4 cm) |
| Jackets and coats in wool | about 1 1/2-2" (4-5 cm) |
Wool can absorb a lot of ease because it shrinks under steam. Crisp cottons and synthetics can't, so a cap with jacket-level ease will pucker in a polyester blouse. If you can't get a cap in smoothly, the easiest fix is often to reduce the ease on the pattern: lower the cap by about 1/4" (6 mm) and redraw it.
Setting in a sleeve
There are two ways to set in a sleeve:
- In the round: sew the side seams of the bodice and the underarm seam of the sleeve first, then set the sleeve tube into the armhole tube. This is the method for dresses, jackets, and any sleeve with real cap ease.
- Flat: sew the sleeve into the armhole while the side seams are still open, then sew the side seam and underarm seam in one continuous line. This is faster, and it's the standard for shirts and knits, where there's little cap ease. It also makes a flat-felled armhole possible.
To set in a sleeve in the round:
- Sew two rows of easing stitches around the cap between the notches, using a long stitch (about 4 mm), just inside the seam allowance, as you would for gathering but without gathering it into folds.
- Pin at the key points. With the sleeve right side out and the bodice inside out, slip the sleeve into the armhole so the right sides are together. Match the underarm seams, the notches, and the shoulder dot to the shoulder seam.
- Ease, don't gather. Pull the easing threads gently until the cap fits the armhole, then distribute the fullness evenly, mostly over the top of the cap. There should be no actual folds or pleats, just a smooth fullness. Pin closely, every 1/2" (1.3 cm) or so.
- Shrink the ease (wool and natural fibres). Before sewing, you can steam the cap over a tailor's ham with the easing stitches drawn up, which shrinks the excess and makes sewing much easier.
- Sew with the sleeve on top so you can see and smooth the ease ahead of the needle. Some sewists prefer the sleeve underneath, letting the feed dogs help ease it in. Try both and see which suits your machine.
- Reinforce the underarm. Sew a second row of stitching in the seam allowance between the notches under the arm, and trim the allowance there to about 1/4" (6 mm). The cap allowances stay full width.
- Press the allowances toward the sleeve without flattening the cap. Press only the seam allowance itself, using the tip of the iron over a ham or sleeve board.
Sewing raglan and kimono sleeves
Raglan: sew any shoulder dart or seam in each sleeve first. Then sew the diagonal raglan seams joining the sleeves to the front and back bodice. Finally, sew the underarm and side seam in one continuous line, as in the flat method. There's no cap ease to manage. Fitting the shoulder comes down to adjusting the dart or shoulder seam.
Kimono: sew the shoulder and overarm seam, then the underarm and side seam. Reinforce the curve where the underarm meets the side seam with a second row of short stitches or a strip of twill tape, and clip the curve so it lies flat, because this point takes a lot of strain. If the pattern has a gusset, set it in carefully at the underarm, pivoting precisely at each point.
Fitting sleeves
- Tight around the upper arm: do a full bicep adjustment, slashing the sleeve vertically through the centre and spreading it at the biceps line. See Fitting and Alterations.
- Diagonal folds twisting toward the front or back: the sleeve's "pitch" doesn't match the way your arm hangs. Rotate the sleeve slightly in the armhole, moving the shoulder dot forward or back by 1/4" (6 mm) at a time, until it hangs straight.
- Puckers in the cap that won't ease out: too much cap ease for the fabric. Reduce it on the pattern.
- Can't raise your arms: the cap is too tall, or the armhole is too low. Counterintuitively, a higher, closer armhole allows more movement than a low one, because the sleeve doesn't pull the bodice up with it.