Flat-Felled Seam
The tough, fully enclosed seam used on jeans and work shirts - how to sew it with or without a felling foot, which side the fell goes on, and how to handle curves and thick crossings.
Published · Updated

A flat-felled seam encloses both raw edges like a French seam, but instead of leaving them in a tube standing up inside the garment, it folds them flat against the fabric and stitches them down. The result is strong, lies completely flat, and shows rows of topstitching from the outside. It's the seam on the inside leg of most jeans and down the sides of classic work and dress shirts. It looks the same inside and out, which is why it's also the standard seam for reversible and unlined garments.
It takes longer than a plain seam and a bit of patience on the first few, but nothing in it is difficult. Most of the skill is in pressing accurately before you sew.
Choosing which side the fell goes on
You decide this at the very first step:
- Start with wrong sides together and the folded strip (the fell) ends up on the outside of the garment. This is the jeans look: a raised band with topstitching along it.
- Start with right sides together and the fell ends up on the inside. From the outside you see a plain seam with a single row of topstitching beside it. This is the quieter shirt look.
Either way, the fell itself has one row of stitching along its folded edge. The "two parallel rows" people expect come from adding a second row of edgestitching along the seam side of the fell. It's optional, but it holds the fell flatter and is part of the classic look.
Seam allowance and tools
Most patterns that call for flat-felled seams give 5/8" (1.5 cm) allowances. Some shirt patterns give a wider allowance on one side and a narrower one on the other, so check the instructions before you trim anything. With a 5/8" allowance you'll end up with a fell just under 3/8" (about 9 mm) wide.
Machine settings. Use a stitch length of 2.5-3 mm for the topstitching, a little longer if you use topstitching thread. For denim use a denim/jeans needle, 90/14 for lighter denim and 100/16 for heavier. For shirting, an 80/12 universal or Microtex works well.
Feet. An edgestitch foot (with a blade down the middle) makes the rows straight and close to the fold without much effort. A felling foot folds the allowance for you as you sew. They come in widths such as 4 mm, 6 mm and 8 mm. It's fast once you've practised with it, but plenty of perfect flat-felled seams have been sewn with an ordinary foot, an iron and a little glue stick.
Step by step
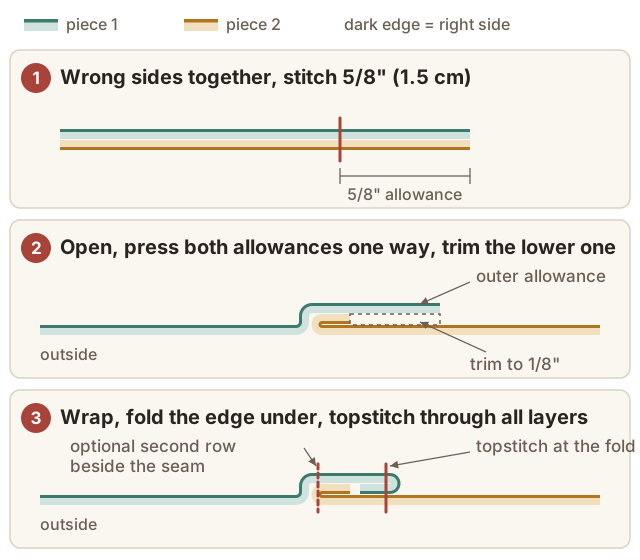
- Sew the seam at the full seam allowance, with wrong sides together for an outside fell or right sides together for an inside fell.
- Press both allowances to one side, together. Decide the direction first. On shirts the side seams usually fell toward the back. On jeans the inseam fell direction is part of the design, so copy a pair you like.
- Trim the lower allowance (the one lying directly against the garment) down to about 1/8" (3 mm). Leave the upper one full width.
- Fold the upper allowance over the trimmed one. Turn its raw edge under so the fold sits just past the trimmed allowance, and press. I press this in two moves: first turning the raw edge under by about 1/4" along the whole length, then folding the whole strip over flat. On slippery fabric, a dab of washable glue stick under the fold saves a lot of pins.
- Topstitch along the folded edge, about 1/16" (1-2 mm) from the fold, through the fell and the garment beneath. Stitch from the right side of the garment so this row looks its best.
- Add the optional second row, edgestitching along the seam side of the fell for the classic two-row finish.
Curves and the sleeve-to-body seam
The flat-felled armhole on a shirt is easier than it looks, as long as you change the order of construction. Sew the sleeve into the armhole before sewing the side seams and underarm seams, while everything is still flat. Fell the armhole seam toward the body. Then sew the underarm seam and side seam in one continuous pass and fell that seam too.
On a curve the folded edge has to be eased slightly. Press the fell carefully with steam, working a few inches at a time, and use more pins or glue than on a straight seam. Shirt sleeve caps are drafted fairly flat for exactly this reason. A high, fully eased sleeve cap (see Sleeve) is not a good candidate for felling.
Getting over thick crossings
Where flat-felled seams cross, such as the crotch seam of jeans or a yoke meeting a side seam, you can have six or more layers of denim under the needle at once. To get through without skipped stitches or a broken needle:
- Trim and grade any enclosed allowances that will be caught in the crossing.
- Hammer the crossing flat (a rubber mallet on a scrap of wood), which compresses denim noticeably.
- Use a hump jumper (also called a jean-a-ma-jig), or a folded piece of card, to level the presser foot as it climbs onto the thick part, so the foot stays parallel to the bed.
- Slow right down and turn the handwheel by hand for the last few stitches over the hump.
Troubleshooting
The fell is wavy or twisted along its length. It wasn't pressed flat enough before stitching, or the fabric shifted. Press the fold again, use a little glue stick, and sew with the fabric supported so it doesn't drag.
The fell width varies. Use the edge of the presser foot (or the edgestitch foot's blade) against the fold as a guide, and look at the guide, not the needle, as you sew.
Raw edges peeking out of the fold. The lower allowance wasn't trimmed narrow enough, or the upper allowance wasn't turned under enough. Unpick a short section, trim, refold and restitch.
Skipped stitches on the topstitching. This is usually a needle that's too fine or too worn for the layers. Change to a fresh denim or topstitch needle in the next size up.
A faster cheat for when it doesn't need to be enclosed
A faux flat-felled seam gives the same look from the outside with fewer steps. Sew a plain seam, finish the two allowances together with an overlocker or zigzag, press them to one side, and topstitch through all the layers from the right side, about 1/4" (6 mm) from the seam. Add a second row close to the seam if you want the two-row look. It's not quite as tough, and the inside isn't as clean, but on a lined jacket or a casual shirt nobody will know.