Fitting and Alterations
How to get a garment to fit - choosing a size, adjusting the pattern before cutting, reading wrinkles on a muslin, a table of common fit problems and fixes, and what can realistically be altered after sewing.
Published · Updated

Fitting is the part of dressmaking that makes the effort worthwhile. A well-fitted garment in plain cotton looks better than an expensive fabric that pulls and gapes. It's also the part people find most intimidating, because fit problems can seem mysterious. They become far less mysterious once you know that most of them fall into a small number of patterns, and that the fabric itself shows you what's wrong.
Fitting happens at three stages, and it gets harder and more limited at each one: adjusting the pattern before cutting, fitting a muslin (a test garment), and altering a finished garment. Do as much as possible at the earliest stage.
Stage 1: choose the right size
Commercial patterns are sized by body measurements, not ready-to-wear sizes, so a pattern size is often one or two sizes larger than what you buy in shops. Ignore the number and go by the measurement chart:
- For tops and dresses, choose by your high bust, not your full bust, if your full bust is more than about 2" (5 cm) larger than your high bust. Patterns are drafted for a B cup. Choosing by the full bust gets the bust right but leaves the shoulders, neck and armholes too big. Choose by high bust to fit the frame, then add room at the bust with a full bust adjustment.
- For skirts and trousers, choose by your hip, then adjust the waist.
- Blend between sizes. If your bust is one size and your waist and hips another, draw a smooth line from one size's cutting line to the other at the side seams.
Then check the finished garment measurements, which many patterns print on the tissue or the envelope. The difference between your body and the finished garment is the ease, and it tells you how the designer intended the garment to fit. The Ease Calculator does this comparison for you and shows the fit category.
Stage 2: flat pattern adjustments
Some changes are so predictable that you can make them on the paper before cutting anything. The most common is length.
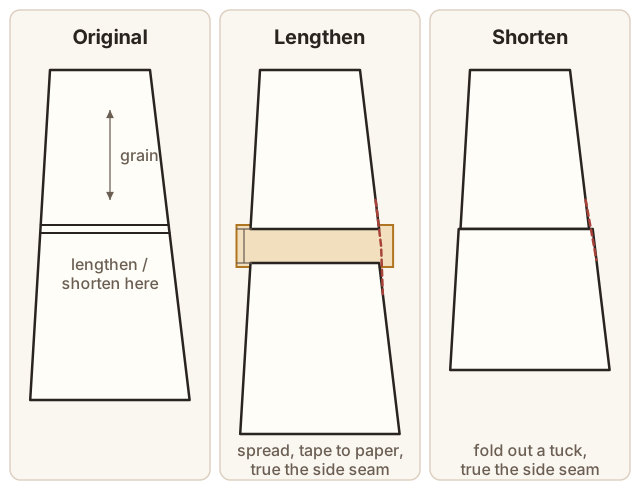
Lengthening and shortening. Patterns mark a double line where length can be changed without distorting the shape: on bodices between the bust and waist, on skirts between the hip and hem, on sleeves above and below the elbow. To lengthen, cut on the line, spread the pieces apart by the amount needed over a strip of paper, and tape them. To shorten, fold out a tuck half as deep as the amount to remove. Either way, redraw (true) the side seams so they're smooth across the change, and make the same change to every piece that joins the one you've altered.
Compare your back length (nape to waist) and front length with the pattern's to see whether the bodice needs adjusting above the waist. Compare your skirt length to see where the hem will fall.
Other common flat adjustments, such as full bust, swayback and forward shoulder, are covered in the table below. Most are done by slashing the pattern along specific lines and spreading or overlapping it.
Stage 3: fit a muslin
For anything fitted, make a muslin: a test version in inexpensive fabric of similar weight to the real thing. Cut it with wider seam allowances at the side seams (1", 2.5 cm) to allow letting out, mark the centre front, centre back, bust and waist lines on it, and baste it together with a long stitch.
Fit it wearing the underwear you'll wear with the finished garment, ideally with help or in front of two mirrors, and always work from the top down: neck and shoulders, then bust, then waist, then hips. Everything hangs from the shoulders, so changing them changes everything below.
Reading the wrinkles
The fabric tells you what's wrong, in two kinds of marks:
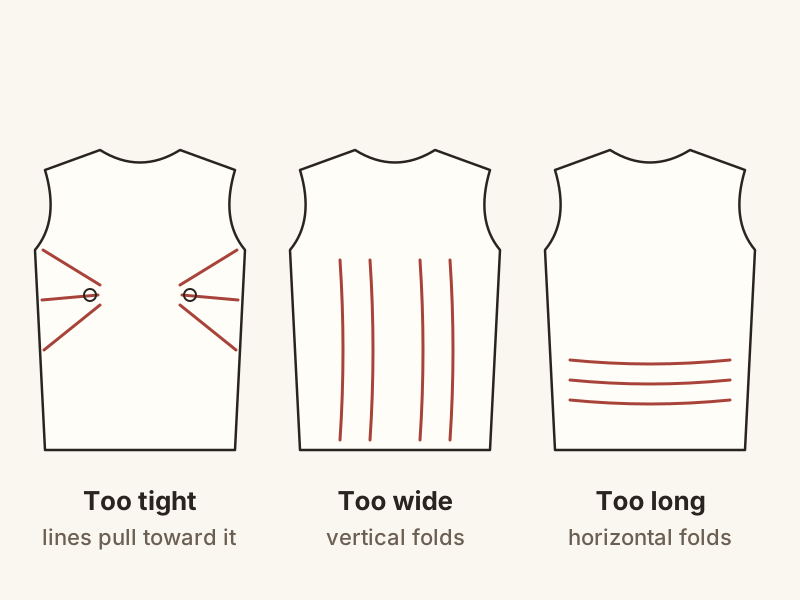
- Strain or pull lines are tight, stretched ridges. They point toward the place that needs more room. Diagonal lines running from the bust toward the side seam say the bust needs more fabric there.
- Folds are loose, hanging creases. They collect where there's too much fabric: vertical folds mean too much width, horizontal folds mean too much length.
The skill is following a line back to its source. Most fit problems are local: the fix belongs at the point a wrinkle radiates from, not in a general resizing of the whole garment.
Common fit problems and fixes
| What you see | What it usually means | Typical fix |
|---|---|---|
| Diagonal pull lines from the bust toward the side seams; the front hem rides up | More room needed over the bust | Full bust adjustment (adds width and length over the bust, enlarges the bust dart) |
| Loose folds above or below the bust; dart points sit beyond the bust | Less room needed over the bust | Small bust adjustment |
| Diagonal folds from the neck toward the underarm | Shoulders are more sloped than the pattern | Lower the shoulder seam at the armhole end |
| Horizontal pull lines across the upper chest or back, straining at the shoulder tips | Shoulders are squarer than the pattern | Raise the shoulder seam at the armhole end |
| Shoulder seam sits behind the shoulder; front armhole pulls | Forward shoulder | Move the shoulder seam forward at the armhole end |
| Horizontal folds across the back just above the waist | Swayback | Fold out a wedge at centre back, tapering to nothing at the side |
| Pulling across the back when reaching forward; back armhole seams strain | Broad back | Add width through the across-back area |
| Neckline gapes away from the body | Neckline too wide or long for the chest | Take a small wedge out of the neckline and rotate it into the bust dart |
| Sleeve pulls around the upper arm; diagonal drag lines in the sleeve | Upper arm needs more room | Full bicep adjustment (widens the sleeve at the bicep line) |
| Diagonal folds in the sleeve twisting toward the front or back | Sleeve is set in at the wrong angle | Rotate the sleeve in the armhole (move the shoulder dot) |
| Skirt side seams swing forward or back | Skirt out of balance, often a prominent tummy or seat | Raise or lower the waist at centre front or back until side seams hang straight |
Fitting books such as Sarah Veblen's The Complete Photo Guide to Perfect Fitting and Pati Palmer and Marta Alto's Fit for Real People show these adjustments step by step, with photographs of real bodies, which is the best way to learn them.
Transferring changes back to the pattern
Mark every change on the muslin with a pen while it's on: new seam lines, pinned tucks, where darts should point. Unpick it, press it flat, and use it as a guide to correct the paper pattern. Make a second muslin if the changes were large. Then keep the corrected pattern, and write the adjustments you made in a notebook or on the pattern envelope, because you'll probably need the same ones on the next pattern from the same company.
Once you have a fitted bodice block, you can lay new patterns over it and see the adjustments needed before you cut.
Altering finished garments
After a garment is sewn, you're limited by how much fabric is left in the seams and hem. What's realistic:
Usually easy
- Taking in side seams, centre back seams and darts.
- Shortening hems, and shortening sleeves at the hem.
- Shortening straps.
- Taking in the waist of trousers and skirts at the centre back seam.
Possible, with limits
- Letting out seams, if there's enough seam allowance. Reducing a 5/8" (1.5 cm) allowance to about 1/4" (6 mm) gains roughly 3/4" (2 cm) of circumference per seam. Ready-to-wear often has only 3/8" (1 cm) and an overlocked edge, which leaves almost nothing.
- Lengthening a hem, if there's a deep hem allowance. The old fold line often stays visible.
Difficult or not worth it
- Narrowing the shoulders of anything with set-in sleeves, which means removing and resetting the sleeves.
- Changing a garment by more than about one size.
- Lengthening a bodice or anything without a hem allowance.
A habit worth building
Fit before you finish. Baste side seams and try the garment on before sewing them permanently, and try it on again before hemming. It takes five minutes, and it catches problems while they're still easy to fix.