Basic Bodice Block
What a bodice block is, the measurements you need, how to fit one with a muslin, and how to move darts around it to create new designs - with a worked dart-rotation diagram.
Published · Updated

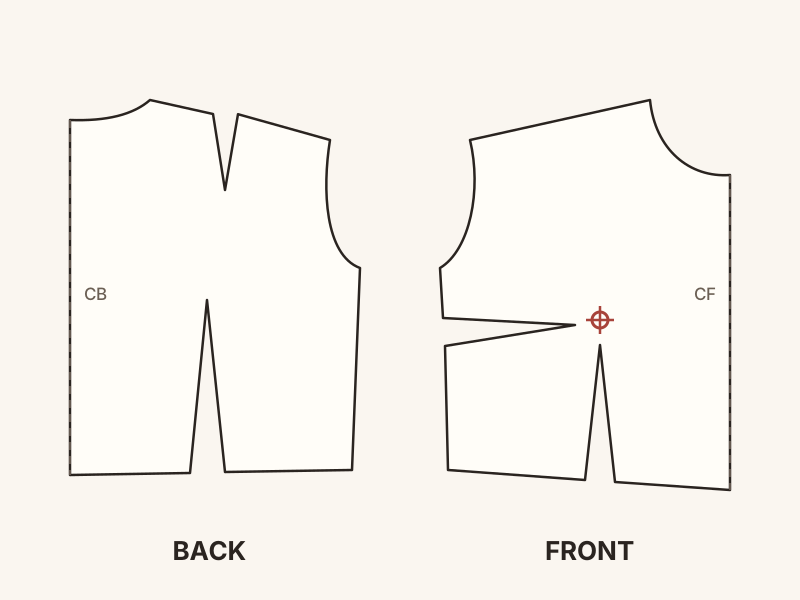
A bodice block, also called a sloper, is a basic bodice pattern fitted to one specific body. It covers the upper body from neck to waist, front and back. It has only the minimum ease needed to breathe and move, and no style features at all: no collar, no design neckline, no button extension, no seam allowances in most systems. You don't make it to wear. You make it so that every future bodice pattern can start from something that already fits.
Once you have a block that fits, designing becomes a matter of tracing it and changing it: lowering the neckline, moving darts, adding a yoke, splitting it into princess panels. The fit underneath stays correct throughout, so every design starts from a garment that fits instead of one you have to fix.
Why it's worth the effort
Commercial patterns are drafted for a standard figure, and almost nobody matches it in every dimension. Most home sewists make the same set of adjustments, such as a full bust adjustment, a forward shoulder or a swayback, to every pattern they buy. With a fitted block you make those adjustments once. You can also lay a commercial pattern over your block to see at a glance where it differs, which tells you what to adjust before you cut anything.
The measurements you need
Drafting systems differ, but most bodice drafts use most of these measurements:
| Measurement | Where it's taken |
|---|---|
| Full bust | Around the fullest part of the bust, tape level |
| High bust | Under the arms, above the bust, across the top of the chest |
| Waist | Natural waist, the narrowest part of the torso |
| Front length | From the side of the neck, over the bust point, to the waist |
| Back length (nape to waist) | From the prominent bone at the back of the neck down to the waist |
| Shoulder length | From the side of the neck to the shoulder bone |
| Across front / across back | Between the arm creases, about halfway down the armhole |
| Bust point (apex) height and separation | From the shoulder to the bust point; distance between the two bust points |
| Side length | From about 1" (2.5 cm) below the armpit to the waist |
| Neck circumference | Around the base of the neck |
The Body Measurement Worksheet has instructions for each of these and a printable sheet to record them on.
Tie a narrow piece of elastic around your natural waist before measuring and leave it there. Every vertical measurement is taken to it, so they're all consistent.
Choosing a drafting system
Rather than give a full draft here (each system has its own sequence of construction lines, and mixing systems causes problems), the realistic routes are:
- Draft from a pattern-cutting book. Winifred Aldrich's Metric Pattern Cutting for Women's Wear and Helen Joseph-Armstrong's Patternmaking for Fashion Design are the standard references. Aldrich drafts from a few key measurements and proportional calculations. Armstrong uses more direct measurements. Either produces a good starting block.
- Start from a commercial fitting shell. The large pattern companies sell basic fitted bodice and dress patterns intended for fitting, usually with fitting lines printed on them. Fit one with a muslin and it becomes your block.
- Drape one on a dress form padded to your shape (see Draping vs. Flat Pattern).
Whichever you choose, the first draft will need fitting. No system produces a perfect block from measurements alone.
Ease in a block
A block contains wearing ease, the minimum extra room for breathing and moving, but no design ease. Systems vary in how much they include. A typical bodice block has around 2-4" (5-10 cm) of ease in total around the bust and much less at the waist. A block that fits like a second skin is too tight to use as a basis for garments. See Ease and the Ease Calculator for how ease relates to finished garment measurements.
Fitting the block with a muslin
- Cut it in muslin (calico in the UK) or another firm, plain cotton, with 1" (2.5 cm) seam allowances at the side seams and shoulders so there's room to let out.
- Mark reference lines on the right side with a coloured marker: centre front, centre back, the bust line, the waist line and the across-back line. On a muslin that fits, these stay straight and level.
- Sew it with a long stitch so it's easy to unpick, and close the centre back with pins, or add a zip.
- Fit from the top down. Neck and shoulders first, because everything hangs from them. Then the bust, then the waist. Changing the shoulders after fitting the bust will change the bust fit again.
- Read the wrinkles. Pull lines point toward where there isn't enough room. Folds collect where there's too much. The Fitting and Alterations page has a guide to the common ones.
- Mark every change on the muslin with a pen: new seamlines, new dart positions, pinned tucks. Then unpick it.
- Transfer the changes to the paper pattern, and sew a second muslin to check. Two or three rounds is normal.
Making it permanent
Once it fits, trace the block onto card or heavy pattern paper (oak tag), without seam allowances. Mark centre front and centre back, grain lines, the bust point, the waist line, the notches, and the date. Label it with your name and the measurements it was drafted from. Never cut up the master. Always trace a working copy for each design.
Moving darts: the key block skill
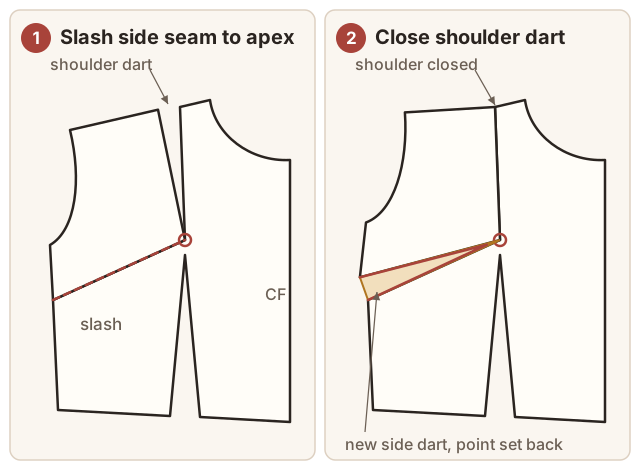
Any dart that points at the bust point can be moved anywhere else around the edge of the pattern, because all that matters to the fit is that the same angle of fabric is removed at the bust point. To move a shoulder dart to the side seam:
- Trace the front block, including the bust point.
- Draw a line from where you want the new dart (here, a point on the side seam) to the bust point.
- Cut along this line up to, but not through, the bust point.
- Close the shoulder dart by bringing its legs together and taping them. The slash at the side seam opens. That opening is the new dart.
- Tape paper behind it, and redraw the new dart's point about 1" (2.5 cm) back from the bust point, so it ends short of the apex (see Dart).
- True the side seam across the new dart: fold the dart closed as it will be sewn and redraw the seam line straight across, so the edge of the dart is the right shape when it's stitched.
The same method creates every other bodice variation:
- French dart: slash from low on the side seam, near the waist.
- Princess seam: move the dart to the shoulder or armhole, then draw a seam line from it down through the bust point to the waist dart and cut the pattern apart along that line.
- Gathered or tucked bodice: move the dart to the neckline or a yoke seam and convert the opening into gathers or tucks instead of a dart.
- Two smaller darts: split one dart into two by cutting two slash lines and dividing the closure between them. This gives a softer shape over a full bust.
Further reading
- Winifred Aldrich, Metric Pattern Cutting for Women's Wear
- Helen Joseph-Armstrong, Patternmaking for Fashion Design
- Sarah Veblen, The Complete Photo Guide to Perfect Fitting