Collar
How collars work - why the shape of the neck edge decides whether a collar lies flat or stands, the main collar types, and how to sew crisp points and edges that roll neatly underneath.
Published · Updated

A collar finishes a neckline and frames the face, and it's one of the first places people look on a garment. Most collars are built the same way: two layers of the same shape (an upper collar and an under collar), stiffened with interfacing, sewn together around the outer edges, turned right side out, and attached to the neckline. What makes one collar lie flat across the shoulders and another stand up around the neck is almost entirely the shape of one edge of the pattern piece.
The parts of a collar
- Neck edge (neckline edge): the edge sewn to the garment's neckline.
- Outer edge (style line): the visible outer edge.
- Stand: the part that rises up from the neckline around the neck.
- Fall: the part that folds over and lies down.
- Roll line: the fold between the stand and the fall.
- Collar points: the front corners of a pointed collar.
On a one-piece collar the stand and fall are one pattern piece, and the roll line forms naturally. On a classic shirt collar, the stand is a separate band.
Why the neck edge shape matters
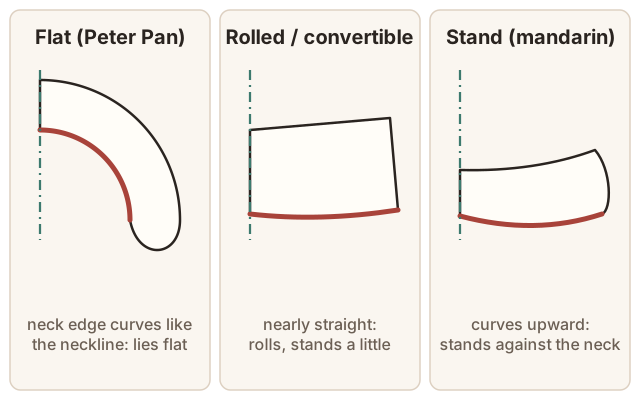
A collar's neck edge is sewn to the garment's neckline, which is a curve. If the collar's neck edge has the same curve as the neckline, the collar simply lies flat on the shoulders: this is a flat collar, such as a Peter Pan or sailor collar. If the neck edge is straightened out, it can't lie flat. When it's sewn to the curved neckline it is forced to rise up, forming a stand, and then roll over. This is a rolled collar, such as a convertible or camp collar. If the neck edge curves the other way, upward at the front, the collar stands up and hugs the neck: this is a stand collar, such as a mandarin collar or a shirt collar's band.
Once you understand this, you can draft a collar for any neckline by drawing it against the bodice's own neckline curve and then straightening the neck edge by as much as you want the collar to stand.
The main collar types
- Flat collars (Peter Pan, sailor, Bertha): drafted by laying the front and back bodice patterns together at the shoulder and tracing the neckline. They suit children's wear, blouses and dresses.
- Rolled / convertible collars: a one-piece collar with a moderate roll, which can be worn buttoned up or open. Found on camp shirts and many dresses.
- Shirt collar with stand: a separate band (the stand) with a collar (the fall) sewn into its top edge. Crisp and formal; the standard on dress shirts.
- Stand / mandarin collars: a band only, standing against the neck.
- Notched / tailored collars: a collar combined with lapels that fold back from the front of a jacket. Their construction is a tailoring subject in its own right.
Making the edge roll under
On a well-made collar the seam around the outer edge sits slightly underneath, out of sight. Three things achieve this:
- Turn of cloth. When a collar folds, the upper layer travels around the outside of the curve, so it needs to be very slightly bigger. Trim the under collar about 1/16"-1/8" (2-3 mm) smaller than the upper collar along its outer edges, tapering to nothing at the neck edge. Then match the edges as you sew. The upper collar is slightly eased onto the under collar, and that extra fabric rolls the seam under.
- Grading. After sewing, trim the seam allowances to different widths: the under collar's allowance narrowest (about 1/8", 3 mm) and the upper collar's a little wider (about 1/4", 6 mm). The layers then step down instead of forming a ridge.
- Understitching. Press both seam allowances toward the under collar and stitch through the under collar and both allowances, about 1/8" (3 mm) from the seam, without catching the upper collar. This holds the seam on the underside permanently.
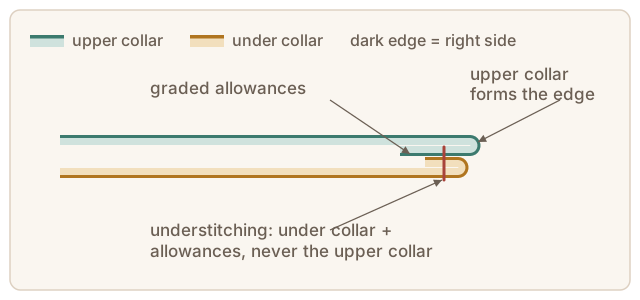
On a pointed collar you can't understitch right into the points. Stop about 1" (2.5 cm) from each point.
Sewing a basic collar
- Interface. Apply fusible interfacing to the upper collar, or to both layers for a firmer shirt collar. Trim the interfacing out of the seam allowances on heavier interfacings to reduce bulk.
- Trim the under collar for turn of cloth, as above.
- Sew the outer edges right sides together, easing the upper collar to fit. At each point, shorten the stitch length for the last 1/2" (1.3 cm), and instead of pivoting sharply, take one or two stitches diagonally across the point. This gives the seam allowances space to fit inside, so the point turns out sharp.
- Trim and grade. Grade the allowances. Trim the corners diagonally, close to the stitching. On outward curves, cut small V-shapes out of the allowance; on inward curves, clip so the seam lies flat when turned.
- Understitch as far as you can.
- Turn and press. Turn the collar right side out. Work the points out with a point turner, a knitting needle or a pin pulled gently from the outside, without pushing through the fabric. Press from the under collar side, rolling the seam slightly under.
- Attach the collar. Staystitch the garment neckline so it doesn't stretch, and clip it so it can straighten out to meet the collar. Match the centre back, shoulder notches and centre front markings. The collar is then sewn between the garment and the facing, or the under collar is sewn to the garment and the upper collar's edge is folded under and stitched over the seam, depending on the pattern.
Troubleshooting
The seam shows on the top of the collar. No turn of cloth or understitching. Press it from underneath, rolling the seam under, and topstitch or edgestitch around the edge to hold it.
Lumpy or rounded points. Too much seam allowance is packed inside. Trim closer at the point, take the diagonal stitches across the point, and grade the allowances.
The collar sits unevenly or tilts to one side. The centre back wasn't matched, or the neckline stretched before the collar was attached. Staystitch necklines soon after cutting.
The collar stands away from the neck. The neck edge is too straight for the neckline (too much stand), or the garment's neckline is too big. Recut with a more curved neck edge, or fit the neckline first.