Seam Allowance
Published · Updated

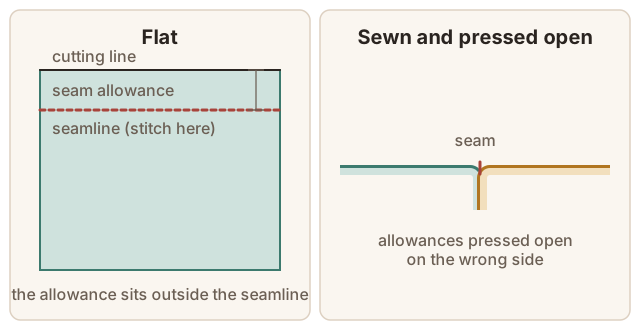
The seam allowance is the strip of fabric between the seamline (where you stitch) and the cutting line (the edge of the fabric). It gives the stitching something to hold on to, stops the seam pulling out of a fraying edge, and leaves fabric to press, finish, or let out later. The garment's actual size is defined by the seamlines. The seam allowance sits outside them and ends up hidden on the inside.
Standard widths
There's no single standard, which is why checking before you cut matters:
- 5/8" (1.5 cm) on most US commercial patterns.
- 3/8" (1 cm) or 1/2" (1.3 cm) on many independent patterns.
- 1/4" (6 mm) on overlocked knit seams, quilting, and some necklines and facings.
- None included in many pattern magazines, European and Japanese pattern books, and on pattern blocks. You add your own.
Some seams use a different width from the rest of the pattern: wider allowances at side seams or centre back for fitting, narrow ones on enclosed edges such as collars and necklines. Hems have their own allowance, usually much deeper. The Seam Allowance Converter converts between inch and metric widths and explains how to add allowances to a pattern that doesn't include them.
Why accuracy matters
Every seam has two allowances, so an error doubles. Sewing a seam 1/8" (3 mm) too wide takes 1/4" (6 mm) off the circumference. On a bodice with four vertical seams, that's 1" (2.5 cm) smaller than the pattern intended, easily the difference between fitting and not. Consistency also matters: if one side seam is sewn at 5/8" and the other at 1/2", the garment twists toward the narrower side.
Sewing a consistent allowance
- Use the guide on the needle plate. Most machines have lines engraved on the plate to the right of the needle. Check whether yours are marked in inches or millimetres, because a 1.5 cm line is not quite 5/8".
- Add a stronger guide if the lines are hard to see: a strip of masking tape, a magnetic seam guide (not suitable for computerised machines, check the manual), or an adjustable seam guide that screws to the bed.
- Watch the guide, not the needle. Keep your eyes on the fabric edge against the guide, a little ahead of the foot.
- On curves, guide the edge at the point directly beside the needle, turning the fabric gradually.
Finishing the allowance
Raw edges of woven fabric fray, so seam allowances are usually finished. Common options:
- Overlocking (serging), quick and neat. See Serger / Overlocker.
- Zigzag over or near the edge on a regular machine.
- Pinking, cutting the edge with pinking shears. Fine for firm, non-fraying fabrics.
- Turned and stitched, folding the raw edge under and stitching it.
- Hong Kong finish, binding each allowance with a bias strip, used on unlined jackets.
- Enclosed seams that have no exposed allowance at all: French seams and flat-felled seams.
Pressing and trimming
Press each seam flat as sewn first, to set the stitches, then press the allowances open or to one side as the pattern directs. In enclosed seams such as collars and facings, the allowances are trimmed, graded, clipped or notched so they lie flat when turned.
Letting seams out
Seam allowances are also your alteration margin. A 5/8" allowance can usually be reduced to about 1/4" (6 mm) without the seam failing, gaining roughly 3/4" (2 cm) of circumference per seam. That's one reason to leave allowances untrimmed and press them open on garments you might want to alter later. Many ready-to-wear garments have narrow overlocked allowances that leave almost nothing to let out.