Dart
How darts turn flat fabric into a shape that fits a curve - the main types, marking, sewing a point without a pucker, pressing, and moving a dart that sits in the wrong place.
Published · Updated

Fabric comes off the bolt flat, and bodies are curved. A dart is the simplest way to reconcile the two: a wedge of fabric folded out and stitched shut. It is wide where you need to remove fabric and tapers to nothing at the point where the fullness is needed. Close a wedge at the waist of a bodice and the fabric above it bulges outward into a cup shape over the bust. Close one at the back of a skirt and it curves over the seat.
Darts are usually the first shaping technique anyone sews, and they're worth getting right because they show. A good dart disappears into the shape of the garment. A poor one ends in a dimple or a little cone that draws the eye straight to it.
The main types
- Single-pointed darts have a wide end on a seamline and taper to a point. These are the most common: waist darts in skirts and trousers, bust darts from the side seam, shoulder darts at the back, elbow darts in fitted sleeves.
- Double-pointed (contour or fisheye) darts are diamond-shaped, with points at both ends. They shape the waist of a dress or jacket without a waist seam, taking in at the waist and releasing fullness both above (for the bust or shoulder blades) and below (for the hips).
- French darts are long, curved darts that start low on the side seam, near the waist, and angle up toward the bust. They give a longer, more diagonal line than a horizontal bust dart.
- Neckline and shoulder darts are small darts that remove gaping at the neck or shape over the shoulder blades.
On a pattern, every dart has the same parts: two legs (the stitching lines), a point, and a centre line that becomes the fold.
Where the point should be
A dart points toward the fullest part of the curve it shapes, but stops short of it. A bust dart that ends right on the bust point makes a sharp peak. Pulled back slightly, the shaping ends just before the fullest part and the fabric curves smoothly over it.
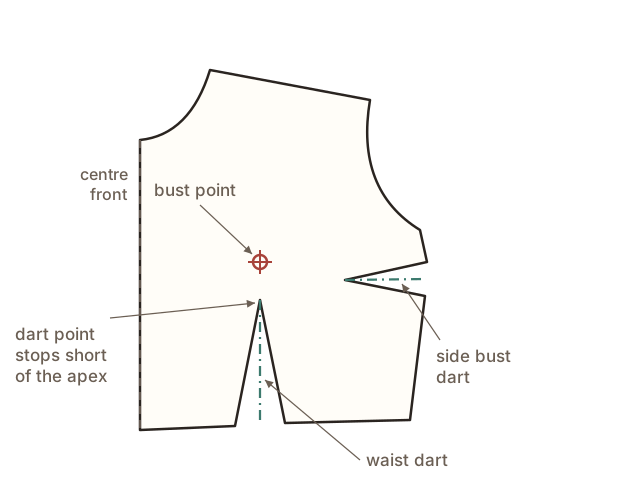
As a rough guide, bust darts end about 1" (2.5 cm) from the bust point for a smaller cup, and closer to 2" (5 cm) for a fuller one. Waist darts on skirts usually end an inch or so above the fullest part of the hip or seat. Your fitting muslin is the real test (see Fitting and Alterations). Patterns are drafted for an average body, and dart points are one of the things I check first.
Marking darts accurately
Most lopsided darts are marking errors rather than sewing errors. Transfer the legs, the point and the wide-end notches every time:
- Tracing wheel and dressmaker's carbon are quick and accurate on firm cottons and wools, marking both layers at once on the wrong side. See Tracing Wheel.
- Tailor's tacks (loose loops of thread through the pattern and both fabric layers) are the safest option for silks, sheers, and anything carbon would show on.
- Snips and a pin hole. Snip the two legs a scant 1/8" (3 mm) into the seam allowance at the wide end, and mark the point with a pin or an awl pushed through both layers, then chalk where it comes out.
Sewing the dart
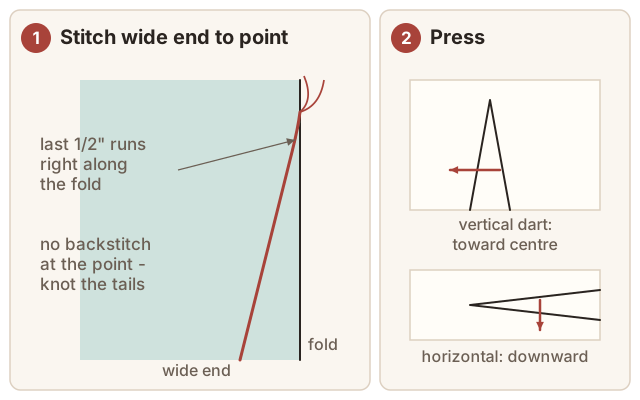
- Fold the dart right sides together along its centre line, matching the snips at the wide end and putting a pin straight through both legs at the point to check they line up.
- Draw the stitching line with chalk from the wide end to the point if you're new to darts. A straight line is easier to follow than two dots.
- Stitch from the wide end toward the point. Backstitch at the wide end, where it will be caught in a seam anyway.
- Taper off at the point. For the last 1/2" (1.3 cm) the stitching should be running almost parallel to the fold and only a thread or two in from it, then off the edge of the fabric entirely. Many sewists shorten the stitch length to about 1.5 mm for this last stretch.
- Don't backstitch at the point. Backstitching there creates a hard knot of thread that shows as a lump. Leave long tails and tie them in a square knot, or let the shortened stitches lock themselves.
Double-pointed darts are sewn from the middle (the widest part) out to each point, overlapping a few stitches in the middle so there is no gap. Clip the fold at the widest point, almost to the stitching, so the dart can lie flat.
Pressing
Press a dart over a curved surface, ideally a tailor's ham, so you don't flatten the shape you've just created.
- Press it flat as sewn first, to set the stitches. Don't press beyond the point.
- Then press it to one side: vertical darts toward the centre (centre front or centre back) and horizontal darts downward.
- In heavy fabrics such as wool coating, cut the dart open along the fold to within about 1/2" (1.3 cm) of the point and press it open, so it doesn't make a ridge.
- On sheer fabrics, where the dart shows through, trim the dart to about 1/4" (6 mm) and finish the raw edges together, or use a thread-tracing method so there's nothing to show.
Moving or changing a dart
A dart that sits in the wrong place can be redrawn on the pattern without changing the fit, as long as it still points at the same place. To lower a bust dart, mark the correct bust point, then redraw both legs from the wide end to the new point, ending the same distance short as before. To move a dart to a different seam entirely, use dart rotation: you slash to the bust point, close the old dart and let a new one open elsewhere. That method is shown step by step on the Basic Bodice Block page.
The same principle lets a designer turn darts into seams (princess lines are darts carried through to an edge), gathers, pleats or tucks. The shaping is the same, only expressed differently.
Troubleshooting
A dimple or pucker at the point. The stitching left the fold too abruptly, or the point was backstitched. Unpick the last inch and restitch with a longer, more gradual taper along the fold.
A pointy cone instead of a smooth curve. The dart is too short for its width, or ends too close to the bust point. Lengthen it slightly, or split the intake between two smaller darts.
The darts don't match left to right. Check the marking first, then measure the finished darts from the centre front. A 1/8" (3 mm) difference is visible on a fitted bodice.
A ridge shows on the right side. The dart needs pressing over a ham. On heavy fabrics, slash and press it open. A strip of brown paper slipped under the dart while pressing stops the edge imprinting through.