Notch
Published · Updated

Notches are matching marks on the cut edges of pattern pieces. On the paper pattern they're printed as small triangles, diamonds or short lines across the cutting line. When the fabric is cut, they're transferred as tiny cuts at the edge. Two pieces that will be sewn together have notches in matching positions, so lining them up guarantees the pieces are joined at the right points, the right way round and the right way up.
They look like a minor detail, but they carry information that's otherwise lost once the paper pattern is unpinned: which edge is which, which way a piece faces, and where fullness is supposed to go.
What notches tell you
- Where to match. A sleeve cap and an armhole are different shapes, and it's not obvious which part of one meets which part of the other. Notches pin that down.
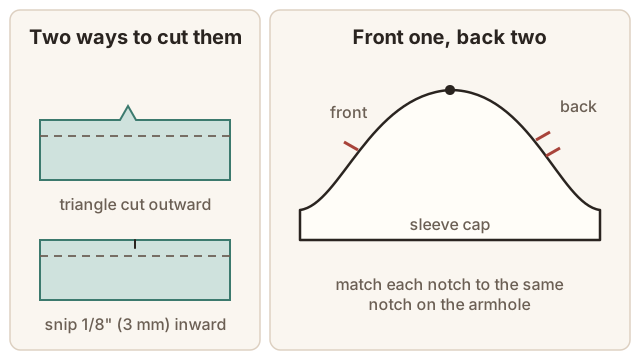
- Front from back. By a near-universal convention, a single notch marks the front and a double notch marks the back of an armhole, sleeve or side seam. That's often the only way to tell a left sleeve from a right one.
- Which pieces go together. Multi-piece patterns number their notches (1, 2, 3…), so notch 3 on one piece meets notch 3 on another.
- Where something starts or stops. Notches also mark the end of a zipper opening, the limits of gathering or easing, a dart's wide end, a fold line, or the centre front.
Cutting notches
There are two common ways to transfer them:
- Snips. Cut a short snip straight into the seam allowance at each notch, no more than about 1/8" (3 mm) deep, so it stays well clear of the seamline. This is quick and accurate, and the standard in workrooms. Avoid it on loosely woven or fraying fabrics, where a snip can fray into the seam, and on seams you might need to let out.
- Outward triangles. Cut around the printed triangle so it sticks out from the edge. This doesn't weaken the seam allowance at all and is easier to see, but it's slower, and the points get trimmed away with the seam allowance later.
Double notches are cut as two separate snips or two triangles. Some sewists cut one wide triangle for a double notch, which is fine as long as you remember which is which.
On fabrics where neither works well, such as heavy wools, sheers and loose weaves, mark notches with chalk, a tailor's tack, or a short line of thread.
Using them when sewing
- Match the notches first, before pinning anything else, and pin through them.
- Then match the ends of the seam.
- Then pin between, distributing any extra length evenly. Where a pattern has more length between two notches on one piece than on the other, that's deliberate ease (for example on a sleeve cap or a back shoulder seam). Ease it in rather than trimming it off.
If notches don't line up when you match the ends of a seam, stop and check. Usually it means a piece is upside down, flipped, or paired with the wrong partner. Occasionally it shows an error in a pattern adjustment, such as lengthening a front bodice without lengthening the back.
Adding notches to your own patterns
When drafting or adjusting a pattern, add notches wherever two edges could be matched wrongly: at least one on each long seam, two (or one asymmetrically placed) on curved seams, and the single/double convention on armholes and sleeves. After any fitting adjustment, walk the seams of the adjusted pieces against each other and re-mark the notches so they still meet.