A-Line Skirt
Drafting and sewing an A-line skirt - two ways to draft the flare, how much fabric to buy, fabric choices, and hemming a curved hem so it hangs evenly.
Published · Updated

An A-line skirt fits closely at the waist and flares out in a smooth, unbroken line to a hem that's wider than the hips. There are no gathers or pleats, just shaped panels, so the silhouette looks like the letter A. It suits almost everyone, it's comfortable, and the flare forgives small fitting errors that a straight pencil skirt would show.
It's also the garment I'd suggest as a first self-drafted pattern. There's one fitting area (the waist to hip), no sleeves or collar, and drafting it teaches the key idea behind flat pattern work: you can move fullness around a pattern without changing how it fits.
What you need to know before drafting
Take these measurements over the underwear you'll wear with the skirt (the Body Measurement Worksheet explains how to take each one):
- Waist, at the natural waist, the narrowest part of the torso.
- Hip, at the fullest part of the hips and seat.
- Waist to hip, measured down the side, from waist to the hip line. Usually 7-9" (18-23 cm).
- Skirt length, from waist to the hem position you want, down the side.
Method 1: closing the dart (from a skirt block)
If you have a straight skirt block (a basic fitted skirt pattern with waist darts), you can turn it into an A-line without redrafting anything:
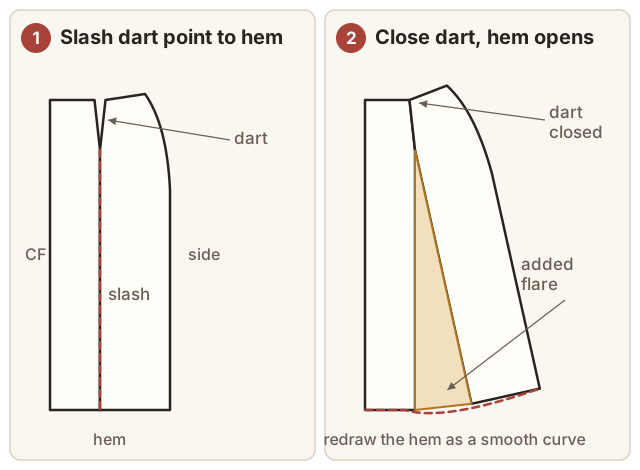
- Trace the front block. Draw a line from the dart point straight down to the hem, parallel to the centre front.
- Cut along that line from the hem up to the dart point, without cutting through it.
- Close the dart by bringing its legs together and taping them. The cut opens into a wedge at the hem. That wedge is your new flare.
- Tape paper behind the wedge and redraw the hem as a smooth curve.
- Repeat for the back.
Closing the whole dart gives a moderate A-line with a perfectly smooth waist. Close only half the dart for a gentler flare, keeping a smaller dart at the waist. For more flare, draw two or three more slash lines across the pattern and spread each one a little at the hem, pivoting at the waistline. Spreading the flare across several slashes distributes it evenly, so you don't get a triangular "trumpet" bulge at the side seams.
Method 2: drafting directly from measurements
Without a block, a simple A-line can be drafted straight onto paper. This is for the front. The back is the same, with its own darts.
- Draw a rectangle. Its width is your hip measurement ÷ 4, plus 1/2" (1.25 cm) ease. Its height is your skirt length. The left edge is the centre front, the top edge is the waistline.
- Mark the hip line across the rectangle, your waist-to-hip measurement down from the top.
- Mark the waist. Measure your waist ÷ 4, plus 1/4" (6 mm) ease, along the top from centre front. The difference between that and the full rectangle width at the top is the amount to remove between the hip and waist.
- Remove that difference partly at the side seam and partly in a dart. Curve the side seam in by up to about 3/4" (2 cm), and raise the side waist by about 3/8" (1 cm) to follow the body's curve. Put the rest into a dart about halfway between centre front and the side, 3-4" (7.5-10 cm) long at the front. Back darts are usually a little longer and deeper than front darts.
- Add flare at the hem. Extend the hem outward at the side seam by 1 1/2"-3" (4-7.5 cm). Draw the new side seam from the hip point to this new hem point.
- Square the hem corner. The hem must meet the side seam at a right angle, or there will be a point (or a dip) at the side when front and back are joined. Curve the hem up slightly toward the side seam so it meets at 90 degrees.
- Add seam allowances and a hem allowance: 5/8" (1.5 cm) for seams, and 1-1 1/2" (2.5-4 cm) for the hem. Keep the hem narrow, because a curved hem can't be turned up deeply without excess fabric folding in.
Combining both methods works well: draft the basic shape, then add one slash-and-spread through the middle of each panel for evenly distributed flare.
Fabric and how much to buy
The same pattern behaves very differently in different fabrics. Crisp cotton poplin, twill, denim, linen and wool flannel hold the A shape and stand away from the body. Softer rayon, crepe and silk drape and swing, and the flare collapses into soft folds. Both look good, so choose deliberately.
As a rough guide, a knee-length A-line skirt in a typical size takes about 1-1 1/4 yards (0.9-1.2 m) of 60" (150 cm) wide fabric, because the front and back pieces fit side by side across the width. In 45" (115 cm) fabric, the pieces have to be laid one above the other, so allow about 1 3/4-2 yards (1.6-1.8 m). Larger sizes, longer lengths, more flare, and directional prints all need more. The Fabric Width Converter can convert a pattern's yardage between widths.
Construction order
- Sew the darts and press them toward the centre (see Dart).
- Sew the side seams, leaving the zipper opening in one side (or sew the centre back seam with an opening at the top, if your skirt has a centre back zip).
- Insert the zipper. An invisible zipper suits most A-lines (see Zipper Insertion).
- Finish the waist with a waistband or a facing. A shaped facing, or a bias-bound edge, sits smoothly at the natural waist. A straight waistband works best when the waist is close to the top of the hips.
- Let the skirt hang overnight before hemming. The flared parts of the panels are slightly off-grain and can drop a little.
- Level the hem (measured up from the floor while wearing it, or on a dress form), then hem it.
Hemming a curved hem
The hem edge of an A-line is longer than the line it folds up to, so a deep hem won't lie flat. Keep the hem allowance to about 1" (2.5 cm), run a line of long gathering stitches near the raw edge, and draw it up very slightly to ease the fullness before pressing the hem up. Alternatively, finish the edge with a narrow double-turned hem, or face the hem with a bias binding strip, which follows the curve easily.
Fitting notes
- Side seams swing forward or back instead of hanging straight down: the skirt is out of balance, usually because of a prominent tummy or seat. Raise or lower the waist at centre front or centre back until the side seams hang vertically. See Fitting and Alterations.
- Horizontal folds just below the back waist signal a swayback. Take a small wedge out of the centre back at the waist, tapering to nothing at the side seams.
- The flare bunches at the sides if most of it was added at the side seam. Move some of it into slash-and-spread lines through the middle of each panel.