Bias
Published · Updated

Woven fabric is made of two sets of threads crossing at right angles: the lengthwise threads (warp) and the crosswise threads (weft). Pull along either set and the fabric barely gives, because you're pulling on threads that run straight in the direction of the pull. Pull diagonally and it's a different story. The square grid of threads distorts into diamonds, and the fabric stretches, narrows and drapes. That diagonal direction is the bias, and the exact 45-degree line between the two grains is the true bias.
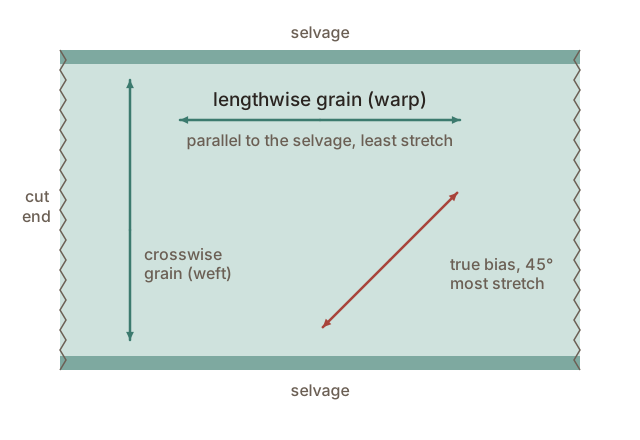
Finding the true bias
Fold the fabric so that a crosswise edge (cut straight along a thread) lies along the selvage. The diagonal fold is the true bias. If the cut end isn't straight, pull a crosswise thread or tear across the fabric first to get a true edge. On a pattern, bias-cut pieces have the grainline arrow drawn at 45 degrees to their edges, so you line the arrow up with the selvage as usual and the piece ends up cut on the bias.
Why the bias behaves differently
On the bias, no threads run in the direction of pull, so nothing resists stretching except the friction of the threads crossing each other. That gives bias-cut fabric three properties:
- Stretch and recovery. A bias strip stretches noticeably and springs back. That's why bias binding can follow a curve smoothly.
- Drape. A bias-cut panel falls into soft, fluid folds and clings to the curves of the body, which is the whole look of a bias-cut slip dress.
- Instability. The same stretch makes bias edges grow when handled, pinned, pressed or sewn. Necklines, armholes and the side seams of A-line and circle skirts all have bias sections that can stretch out of shape.
Where the bias is used on purpose
- Bias binding and bias facings, which curve around necklines and armholes without puckering.
- Bias-cut garments, especially slip dresses, skirts and evening gowns. The technique is closely associated with Madeleine Vionnet and the 1930s bias-cut silhouette, and it came back in the 1990s slip dress.
- Cowl necklines and draped details, where the bias lets the fabric fall into soft folds.
- Piping and cording, so it can turn corners and follow curves.
- Plaids and stripes turned diagonally as a design feature, for example on a yoke or pocket.
Working with bias edges
- Staystitch curved and bias edges, such as necklines and armholes, soon after cutting: a line of regular stitching just inside the seam allowance that stops them stretching while you work.
- Handle gently. Pin without pulling, and lift the iron instead of sliding it.
- Let bias-cut garments hang for at least 24 hours before hemming. The bias sections drop as the fabric relaxes, often by an inch or more on a long skirt. Then level the hem from the floor up.
- Sew bias seams with a little give. A slightly shorter stitch length, or stitching while gently stretching the seam, gives the thread enough slack that it doesn't snap when the fabric stretches in wear.
- Stabilise when you don't want stretch. A strip of lightweight fusible interfacing or stay tape cut on the straight grain stops a bias edge growing, for example at the waist of a circle skirt.
Bias in knit fabric
The term really only applies to woven fabric. Knits stretch because of their looped structure, not because of the angle you cut them at, and knit patterns are cut with the grainline running along the lengthwise rib of the knit. See Knit Fabrics.