Bias Binding
Cutting, joining, pressing and applying bias strips to finish necklines, armholes and raw edges - with strip-width formulas, two application methods, and fixes for rippling and missed stitches.
Published · Updated

Bias binding is a strip of fabric cut at 45 degrees to the grain, folded, and wrapped around a raw edge to finish it. Because it's cut on the bias, the strip can stretch and shrink a little along its length. That lets it follow a neckline or armhole curve smoothly, where a strip cut on the straight grain would pucker or refuse to lie flat.
I use it for three different jobs: as a visible binding that wraps the edge and shows on both sides, as a bias facing that turns completely to the inside so nothing shows from the outside, and as a seam finish (a Hong Kong finish) on unlined jackets. Shop-bought bias tape is fine for quick projects. Cutting your own from the garment fabric or a contrasting cotton makes the inside of a garment look far more deliberate, and it costs nothing but offcuts.
How wide to cut the strips
Work backwards from the finished width you want:
| Type | What it looks like | Cut width |
|---|---|---|
| Double-fold bias tape | Both long edges pressed to the centre, then folded in half | 4 × finished width |
| Double-layer (French) binding | Strip folded in half lengthwise, raw edges stitched together to the garment | 6 × finished width, plus about 1/8" (3 mm) |
| Bias facing | Single-fold strip turned entirely to the inside | 2 × finished width, plus seam allowance |
So a 1/4" (6 mm) double-fold binding for a neckline needs a 1" (2.5 cm) strip, and a 3/8" (1 cm) French binding needs about 2 3/8" (6 cm). Thicker fabrics need a little extra width to turn around the edge. If in doubt, cut a test strip and try it on a scrap.
Bias tape makers are labelled by the width of single-fold tape they produce. A strip twice that width goes in. A "12 mm" maker takes a 24 mm strip and gives 12 mm single-fold tape, which becomes 6 mm double-fold once folded in half again.
Cutting and joining strips
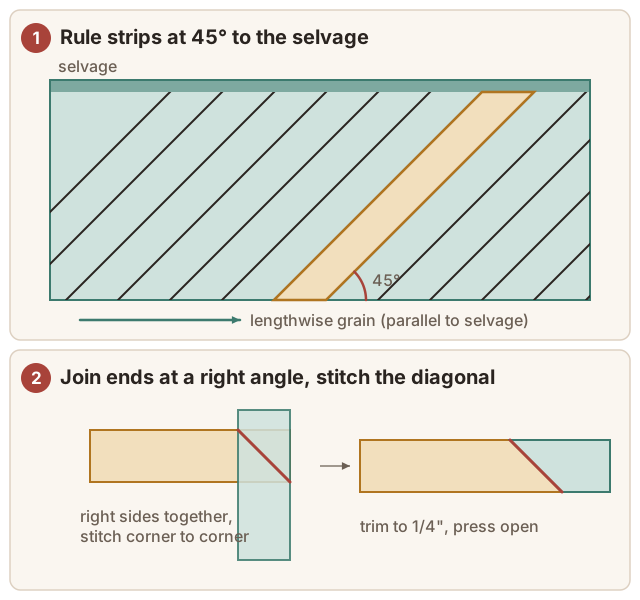
- Find the true bias. Fold the fabric so a crosswise edge lines up with the selvage. The diagonal fold is the true bias. A quilting ruler with a 45-degree line makes this quicker.
- Rule parallel lines at your cut width from that diagonal, and cut along them with shears or a rotary cutter.
- Join strips end to end. Lay two strip ends right sides together at a right angle and stitch across the diagonal from corner to corner. Because the strips are bias, this join runs on the straight grain, so it won't stretch differently from the rest of the strip.
- Trim to 1/4" (6 mm) and press the join open. Pressing open spreads the bulk so it doesn't make a bump when it's folded.
- Press the folds. Feed the strip through a bias tape maker, pressing as it comes out, or press the edges to the centre by hand with a ruler as a guide. For double-fold tape, fold in half again and press.
For a long length, the continuous bias method (sewing a square of fabric into a tube and cutting one long spiral) saves cutting and joining dozens of short strips. For a single neckline, short strips are quicker.
Shaping before you sew
This step makes the biggest difference to a flat neckline. Before applying the binding, lay it along the curve it will finish and press it into shape with steam. Stretch it slightly where it needs to fit an inward curve (a neckline or armhole) and keep it slightly loose around an outward curve. It's much easier to persuade a strip into a curve with an iron than under a presser foot.
Also staystitch the garment's neckline and armholes before binding: a line of stitching just inside the seam allowance, sewn soon after cutting, that stops the curves stretching while you handle them.
Two ways to apply it
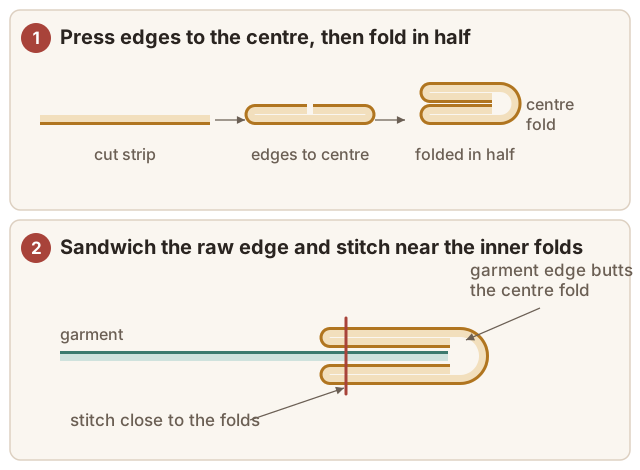
One pass (quick). Trim the garment's seam allowance off the edge being bound, so the raw edge sits where the finished edge should be. Slip it inside the folded binding until it butts against the centre fold. Pin or clip it, then edgestitch through all layers close to the inner folds. This is fast, but the underside can be missed: if the lower edge of the binding sits even slightly short of the upper one, the stitching runs off it. Making the underside of the binding a hair wider (about 1/16" or 1-2 mm) when pressing helps.
Two passes (reliable). This is the method I use for anything that will be seen:
- Unfold one edge of the binding. With right sides together, line its raw edge up with the garment's raw edge and stitch along the first crease.
- Trim the garment's seam allowance down so it fills the binding without being lumpy.
- Wrap the binding over the edge to the other side, so its folded edge just covers the first line of stitching.
- Finish either by stitching in the ditch from the right side, sewing exactly in the groove of the first seam so the stitches disappear and catch the binding underneath, or by slipstitching the fold by hand for an invisible finish.
As a bias facing. Sew a single-fold strip to the edge right sides together, trim and clip, then understitch the strip to the seam allowance and turn it fully to the inside. Press and topstitch or slipstitch in place. Nothing shows from the outside except a clean edge, which is ideal for sleeveless tops when a full facing would be too bulky.
Corners and joining the ends
Outward corners (such as the corner of a square neckline turned the other way, or a placemat) are mitred. Stitch to one seam allowance width from the corner, backstitch, fold the binding up at 45 degrees and then back down along the next edge, and start stitching again from the edge. When the binding is wrapped, a neat diagonal fold forms at the corner.
Closing a loop around an armhole or a neckline without an opening: leave the first 2" (5 cm) of binding unstitched. When you come back round, overlap the ends, trim them so they overlap by twice the binding width, and join them with the same right-angle diagonal seam as above before finishing the stitching. A quicker alternative is to fold the starting end under by 1/2" (1 cm) and lay the finishing end over it.
Troubleshooting
The edge ripples. The binding was stretched while sewing along a straight edge or an outward curve. Bias strips stretch easily, so let the machine feed the strip without pulling, and save the gentle stretch for inward curves.
The neckline puckers or cups. The opposite problem: the binding was too long for an inward curve. Pre-shape it with steam and stretch it very slightly as you sew.
Stitching missed the binding on the underside. Use the two-pass method, or make the underside a little wider when pressing.
The binding twists or won't fold evenly. The strips weren't cut on the true bias. Recut with a proper 45-degree line.