Zipper Insertion
How to insert centred, lapped, invisible and exposed zippers - choosing the right zipper and method, stabilising the seam, matching waist seams across the opening, and fixing waves and bubbles.
Published · Updated

Zippers have a reputation for being difficult, but each insertion method is just a sequence of straight seams sewn in a particular order. The hard parts are the same every time: keeping the fabric from stretching, keeping the stitching straight next to the teeth, and making crossing seams line up on both sides of the opening. Get those three right and any method will look good.
The parts of a zipper
A zipper has two tapes (the fabric strips you sew through), the teeth or coil that interlock, a slider with its pull tab, a top stop on each side, and a bottom stop where the two halves are joined. Separating zippers, used for jackets, have a box-and-pin at the bottom instead of a bottom stop, so the two halves come fully apart.
Coil zippers (nylon) are light, flexible and easy to shorten. Use them for skirts, dresses and trousers. Metal and moulded plastic zippers are stronger and chunkier, for jeans, jackets and bags. Invisible zippers have the coil on the back of the tape, so from the front only the seam shows.
Buy a zipper at least as long as the opening. Coil zippers can be shortened from the bottom by sewing a new bottom stop with a few stitches across the coil and cutting off the excess below it. Invisible zippers are easier to insert if they're about 1" (2.5 cm) longer than the opening, because the slider can be pulled down out of the way of the stitching.
Choosing a method
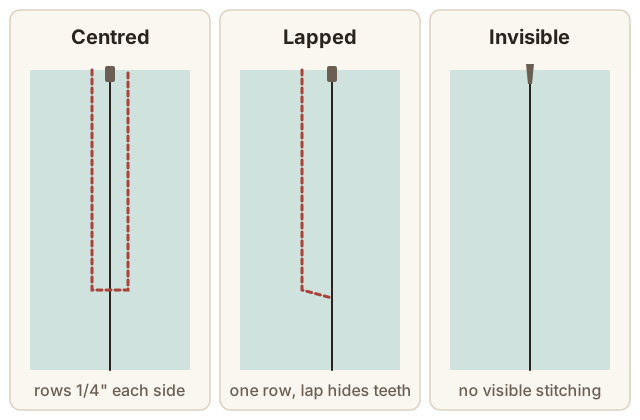
- Invisible zipper: only the seam shows. This is the usual choice for dresses, skirts and anything where you want an unbroken line. It needs an invisible zipper foot (inexpensive, and generic ones fit most machines).
- Centred zipper: two rows of stitching an equal distance either side of the seam. It's symmetrical and straightforward, and works at a centre back.
- Lapped zipper: one side folds over to cover the teeth, so only one row of stitching shows. It's traditional for side openings on skirts and trousers, and in vintage patterns.
- Exposed zipper: the teeth are visible on purpose, as a design feature, set into a slit or a seam with the fabric edges turned back.
- Fly front: the trouser and jeans version of a lapped zipper, with its own facing (fly shield). It's a separate technique.
Before you start: stabilise the seam
The seam allowances that hold a zipper are on the straight grain in most patterns, but they still stretch as they're handled, and if they're even slightly off-grain or on the bias, they will wave. Fuse a strip of lightweight interfacing, about 3/4" (2 cm) wide and cut on the lengthwise grain, to the wrong side of each seam allowance along the zipper opening before inserting the zipper. It's the single most useful step for a flat zipper.
Finish the raw edges of the seam allowances (overlock or zigzag) before the zipper goes in too. It's awkward to do afterwards.
Invisible zipper
- Press the coil flat. With the zipper open, uncurl the coil and press each tape from the back with a cool iron so the coil stands away from the tape. This lets you stitch closer to the teeth.
- Leave the seam open below where the zipper will go. With an invisible zipper, the seam below it is sewn afterwards.
- Pin the first tape. Open the zipper. Lay it face down on the right side of one garment piece, with the coil sitting on the seamline and the tape in the seam allowance. The top stop sits just below the top seamline.
- Stitch the first side with the invisible zipper foot, its groove riding over the coil, from the top down until the foot touches the slider. Backstitch.
- Stitch the second side. Close the zipper and mark where any crossing seams (the waist seam, for example) meet the tape, so you can line them up on the other side. Open it again and pin the second tape to the second garment piece in the same way. Check the zipper isn't twisted, and stitch from the top down.
- Close the seam below the zipper. Close the zipper. Pull the zipper tail out of the way, and with a regular zipper foot, start the seam about 1/16" (2 mm) to the side of, and slightly above, the last stitch of the zipper. Sew down to the hem. Starting exactly at the zipper stitching tends to leave a small bubble.
- Anchor the tails of the zipper tape to the seam allowances with a few stitches.
Centred zipper
- Sew the seam below the opening at normal stitch length. Then baste the opening closed along the seamline with the longest stitch, and press the seam open.
- Place the zipper face down over the pressed-open seam allowances, with the teeth centred exactly over the basted seam, and hand-baste or pin it in place.
- From the right side, using a zipper foot, stitch down one side about 1/4" (6 mm) from the seam, pivot, stitch across the bottom below the bottom stop, pivot again, and stitch up the other side. A strip of 1/4" (6 mm) masking tape along the seam is a perfect stitching guide.
- Remove the basting to open the seam over the teeth.
Lapped zipper
- Sew the seam below the opening and baste the opening closed, as for the centred zipper. Press it open.
- Decide which side will lap over the zipper (on a skirt side seam, the front usually laps toward the back). Working from the inside, open out the seam allowance of the other side, the underlap. Lay the zipper face down on it, teeth on the seamline, and stitch the tape to that allowance only, close to the teeth.
- Turn the zipper face up. This forms a small fold in that seam allowance next to the teeth. Edgestitch along that fold through the allowance and tape only.
- Lay the garment flat, right side up. From the right side, stitch through the garment, seam allowance and the other zipper tape, about 3/8" (1 cm) from the seam, angling across to the seam at the bottom. This is the one visible row.
- Remove the basting.
Getting the stitching past the slider
The slider always gets in the way partway along. Stop with the needle down, lift the presser foot, and slide the pull past the needle (up or down, whichever is out of the way). Lower the foot and carry on. Basting the zipper in place first means nothing shifts while you do this.
Matching seams across the zipper
Where a waist seam or a yoke seam crosses the zipper, the two sides have to line up exactly when it's closed. The reliable method: stitch the first side, close the zipper, and mark the crossing seam's position on the second tape with chalk. Then open it and use that mark to pin the second side. Hand-basting the second side and checking with the zipper closed, before machine stitching, saves a lot of unpicking.
Troubleshooting
The zipper waves or ripples. The fabric stretched while being stitched. Stabilise the seam allowances with interfacing strips, baste before machine stitching, and don't pull the fabric through the machine.
The coil shows on an invisible zipper. The stitching is too far from the coil. Press the coil flat again and restitch closer, with the groove of the invisible foot right over the coil.
A bubble at the bottom of an invisible zipper. The seam below was started exactly in line with the zipper stitching, or too far from it. Unpick about 1" (2.5 cm) and restart the seam slightly to the side of the zipper stitching.
The seams don't line up across the closed zipper. Mark the crossing points on the second tape with the zipper closed, as described above.