Pleating
Knife, box and inverted box pleats explained with diagrams - how to work out the fabric you need, mark and press pleats that stay crisp, and fit a pleated skirt at the hip.
Published · Updated

Pleats and gathers both fit a wide piece of fabric to a narrower edge, but they look completely different. Gathering gives soft, random fullness. Pleating folds the fabric back on itself in controlled, measured folds, so you get crisp vertical lines that open as you move and close as you stand still. A kilt, a school skirt, the back vent of a jacket, the inverted pleat at the centre back of a shirt yoke: all pleats.
Pleating is more exacting than gathering. Every pleat has to be marked, folded and pressed identically, because any unevenness shows immediately. In exchange you get a precise, tailored look and a garment that can be perfectly fitted at the waist while still swinging freely at the hem.
The three basic pleats
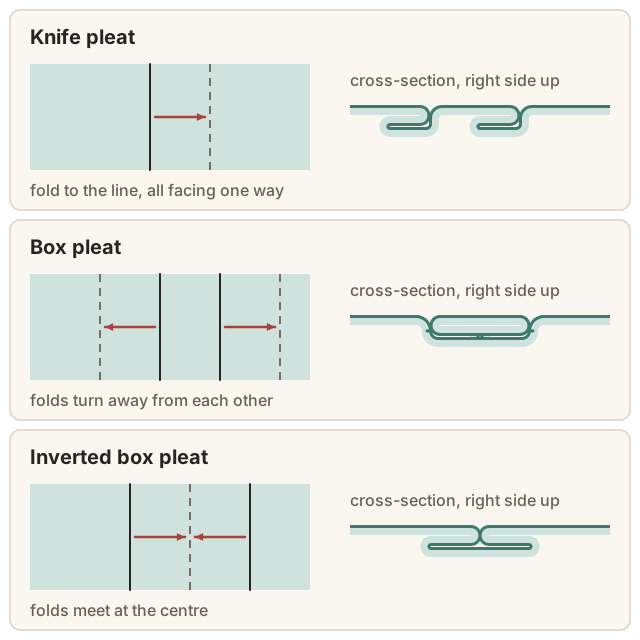
- Knife pleats all fold in the same direction, like the pleats of a kilt or a tennis skirt. Each one hides a strip of fabric underneath it.
- Box pleats are two knife pleats folded away from each other, so a flat panel (the box) stands proud on the outside, with the folded fabric meeting behind it.
- Inverted box pleats are the reverse: two folds meet at the centre on the outside, with the extra fabric behind. This is the classic single pleat at the centre front of an A-line skirt, which gives walking room, or at the centre back of a shirt.
Other pleats are variations on these. Accordion (sunray) pleats are narrow, permanent, factory heat-set pleats in polyester. Cartridge pleats are tiny rolled pleats used on historical garments to fit a huge width of fabric into a short waistband. Kick pleats are short pleats at the hem of a straight skirt, for walking room.
How much fabric pleats take
Each pleat hides fabric behind it. For a knife pleat of depth d (how far the fold reaches back underneath), the hidden fabric is 2 × d. A box or inverted box pleat is two knife pleats, so it hides 4 × d.
Fabric width needed = finished width + (hidden fabric per pleat × number of pleats)
Worked example. A skirt with a 28" (71 cm) waist, knife-pleated all the way round with pleats spaced 2" (5 cm) apart, has 14 pleats.
- With a 1" (2.5 cm) pleat depth, each pleat hides 2", so you need 28 + (14 × 2) = 56" (142 cm) of fabric around: a 2:1 ratio.
- With a 2" (5 cm) depth, so each pleat's underlay reaches right back to the previous fold, each pleat hides 4": 28 + (14 × 4) = 84" (213 cm). This is the "full" 3:1 ratio of a traditional kilt.
Add seam allowances, and plan for the joins between fabric widths. Seams between panels should be hidden in the inside fold of a pleat, where they won't show.
Marking
Accuracy comes from marking every pleat both at the top edge and at the hem, so the fold runs straight down the grain:
- Mark fold and placement lines on the wrong side with a tracing wheel or chalk and a long ruler, or with small snips in the seam allowance at the top and in the hem allowance at the bottom.
- For long pleats in fabric you can't mark easily, thread-trace the fold lines with a contrasting basting thread.
- Check the spacing with a tape measure across the whole width before folding anything. A 1/16" (2 mm) error repeated over 14 pleats adds up to nearly an inch.
Folding, pressing and stitching
- Hem first. Pleated skirts are normally hemmed before pleating, because you can't press a crisp hem through the folds afterwards. Level the hem on a flat piece of fabric, then hem it.
- Fold and pin each pleat from the right side, bringing each fold line over to its placement line. Pin at the top and every few inches down the length.
- Baste across the top, inside the seam allowance, to hold the pleats in position, and check the finished width against the waistband or bodice it will join.
- Press. Use plenty of steam and a press cloth, and let the fabric cool and dry completely before moving it. Cooling is what sets the crease. For firm creases on wool, a clapper (a block of hardwood pressed down on the steamed fold) helps a lot. To stop the under-folds printing through to the right side, slip strips of brown paper under each fold while pressing.
- Stitch them down if needed. Skirt pleats are often stitched closed from the waist to the hip line, either edgestitched along the fold from the outside or stitched on the inside, so the skirt stays smooth over the hips and the pleats release below.
- Edgestitch the folds (optional). Stitching close to the inner and outer fold of each pleat along its full length keeps soft fabrics creased permanently.
Choosing fabric
Wool is the classic: it takes a sharp crease with steam and holds it, which is why kilts and school skirts are wool. Polyester and poly blends can be heat-set permanently, and commercial pleating services use this for accordion pleats. Cotton pleats press well but soften with wear and washing, so plan to repress or edgestitch them. Silk and rayon are soft and fluid. They make beautiful unpressed pleats but won't hold a sharp knife edge without stitching.
Fitting a pleated skirt
A waist and hip that differ by more than the pleats can absorb means the pleats will be pulled open at the hip. To fit, adjust each pleat slightly at the waist rather than changing the side seams. Take a little more depth into each pleat at the waist, tapering to the original depth at the hip line, so the extra is spread evenly around. Then stitch the pleats down to the hip line to hold that shaping.
Troubleshooting
Pleats spread open over the hips. The skirt is too tight at the hip for the pleat arrangement. Let out a little depth at hip level, or stitch the pleats down further.
The hem is uneven after pleating. The fabric was pleated off-grain, or the waist was fitted after the hem was sewn. Hem first, check that every fold line is on the straight grain, and level the skirt at the waist if needed.
Pleats won't stay crisp. Use more steam, a press cloth and a clapper, and let the fabric cool before moving it. Edgestitch the folds on fabrics that won't hold a press.
The folds show as ridges through the outer layer. Press with paper strips under each fold, and avoid pressing over pins and basting.