Buttonhole
Sizing, placing and sewing machine buttonholes that don't gape or stretch - with a placement diagram, the bust-point rule, cutting them open safely, and what to do when the machine stalls.
Published · Updated

A buttonhole is a slit in the fabric, reinforced by dense stitching down both sides and a bar tack across each end, sized so its button passes through snugly. Most modern sewing machines sew one automatically. But the machine only does the stitching. Deciding the length, placing the buttonholes so the garment doesn't gape, stabilising the fabric underneath, and cutting the slit open cleanly are all still yours to get right. Those are the steps that decide whether a shirt looks homemade or finished.
Types of buttonhole
- Machine (bar-tack) buttonholes are the narrow rectangles found on shirts, blouses and dresses. Every machine with a buttonhole function does these.
- Keyhole buttonholes have a round opening at one end where the button's shank sits. They're used on coats, jackets and jeans, where buttons are thick. Some machines sew them, and industrial buttonhole machines are used for them in ready-to-wear.
- Bound buttonholes are made with small strips of fabric folded to form "lips" around the opening, like a tiny welt pocket. They're a couture and tailoring technique for coats and jackets, and are sewn before the facing is attached.
- Hand-worked buttonholes are sewn with buttonhole stitch over a cut slit. They're slow, but they're the traditional finish on fine tailoring and the only option for some historical garments.
This page focuses on machine buttonholes.
Working out the length
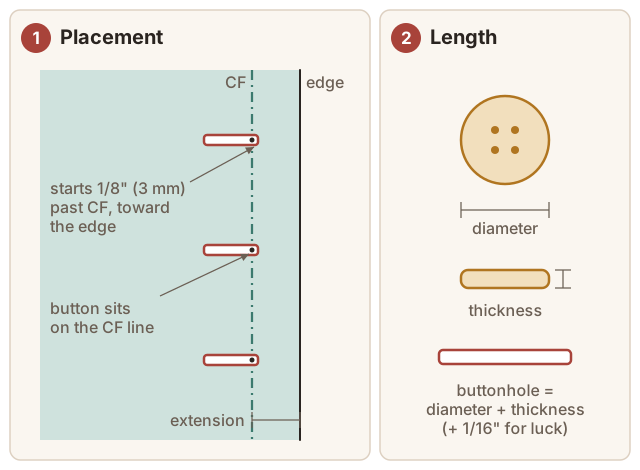
The opening needs to be as long as the button's diameter plus its thickness. A domed or shanked button needs more than a flat one of the same diameter. For awkward shapes, wrap a narrow strip of paper around the widest part of the button, mark where it meets, and halve that measurement. Add about 1/16" (1-2 mm) for heavier fabrics.
Machines with a one-step buttonhole foot measure this for you: you put the button in the slot at the back of the foot and the machine sews to that length. Even so, sew a test buttonhole on a scrap with the same fabric and interfacing layers, cut it open and push the button through before committing to the garment.
Placing the buttonholes
Centre front is where the buttons sit. On a shirt or blouse opening, the button is sewn on the centre front line, and the overlap beyond centre front (the extension) is roughly equal to the button's diameter. That way, when the garment is buttoned, the centre front lines of both sides sit on top of each other.
Horizontal buttonholes start about 1/8" (3 mm) past the centre front line toward the edge, and run inward. When the garment is buttoned, the button is pulled toward the edge and sits at the outer end of the buttonhole, right on centre front. Use horizontal buttonholes wherever there's strain across the opening: waistbands, cuffs, jackets, fitted bodices.
Vertical buttonholes sit directly on the centre front line, with the button sitting about 1/8" (3 mm) below the top end. They're used on narrow shirt plackets, where there isn't room for a horizontal buttonhole, and where there's little sideways strain.
Spacing:
- Place the top buttonhole at the neckline, half the button's diameter plus about 1/4" (6 mm) below the finished edge.
- On a fitted top, place one buttonhole level with the bust point. If buttons fall above and below the fullest part of the bust instead, the front will gape open between them. This is the most useful placement rule there is.
- Put one at the waist on a dress or fitted jacket.
- Space the rest evenly between these fixed points, adjusting the gaps slightly rather than moving the bust or waist buttonhole.
By convention, buttonholes are on the right front of women's clothes and the left front of men's.
Sewing them
- Interface the area before anything else. The buttonhole band, placket or facing should already have fusible interfacing applied. Without it, buttonholes on lightweight fabric stretch out of shape the first time they're used.
- Mark each buttonhole with chalk or a water-soluble pen: a line for the length and a short cross-line at the end where stitching starts. Mark them all before sewing, and measure twice.
- Set the machine. Follow your manual for one-step or four-step buttonholes. Use a fresh needle and good thread. Matching thread hides small irregularities; contrast thread shows everything.
- Sew. Keep the fabric flat and let the machine feed. Don't push or pull. On fabric that tends to stretch, such as knits, loose weaves or bias areas, use a strip of tear-away stabiliser underneath. A gimp cord (a heavier thread laid under the stitching, which some buttonhole feet are designed to hold) gives a firmer, raised buttonhole that resists stretching.
- Seal the slit (optional). A thin line of seam sealant such as Fray Check along the cutting line, allowed to dry fully, stops fraying on loosely woven fabrics.
Cutting them open
This is the moment most likely to ruin a finished garment, so take precautions:
- Put a pin across each end of the buttonhole, just inside the bar tacks, as a stop.
- Cut with a buttonhole chisel pressed straight down onto a cutting block, which makes a clean slit of the exact length, or with small, sharp embroidery scissors.
- If you use a seam ripper, start in the middle and cut toward each end, stopping at the pins. Never cut toward yourself from the end.
Troubleshooting
The machine stalls or the stitching bunches at a seam. The presser foot is tilting over the thickness of a placket edge. Put a folded scrap of fabric of the same thickness under the back of the foot to keep it level, or start the buttonhole from the thicker end.
The two sides are uneven, or one is denser. The fabric was dragged as it fed. Make sure nothing is hanging off the table and pulling, and keep your hands off the fabric while the machine sews.
The buttonhole stretched out of shape. It needs interfacing or a stabiliser underneath, or a gimp cord.
I cut through a bar tack. Sew a bar tack over the damaged end by hand, or with a narrow, dense zigzag at zero stitch length. On a test piece, that's the lesson to use pins next time.
Sewing on the button
Sew the button on the centre front line, level with the outer end of a horizontal buttonhole. On anything thicker than shirting, make a thread shank: hold a toothpick or matchstick across the top of the button while sewing, then remove it, wind the thread around the stitches under the button a few times, and finish on the back. The shank lifts the button so the buttonhole layer can sit flat underneath it instead of pulling.