French Seam
A seam sewn twice so the raw edges end up sealed inside a narrow tube - the cleanest finish for sheers and lightweight fabrics, with step-by-step diagrams, seam allowance maths, and fixes for whiskers and puckers.
Published · Updated

A French seam is a seam sewn twice. The first pass joins the pieces with the wrong sides together, so the seam allowance ends up on the outside. You trim that allowance down, fold the fabric back on itself so the right sides are together, and sew again a little further in. The second line of stitching traps the trimmed edges inside a small tube. From the outside it looks like any other seam. On the inside there is a neat, narrow fold with no raw edges at all.
It needs no overlocker, no binding, and no extra fabric, and it is still the finish I'd choose first for anything sheer or anything that frays badly. This page covers when it works (and when it doesn't), how to make it fit inside whatever seam allowance your pattern gives you, and what to do when it goes wrong.
When a French seam is the right choice
French seams work best when three things are true:
- The fabric is light to medium weight. Chiffon, georgette, voile, lawn, batiste, organza, crepe de chine, lightweight linen and quilting-weight cotton are all good candidates. Each French seam stacks four layers of fabric, so a bulky wool or a heavy denim gives you a hard ridge that shows on the outside.
- The seam is straight or gently curved. Side seams, shoulder seams, centre back seams, and the seams of gathered skirts are ideal. A tight curve like an armhole can be done, but the inner tube can't be clipped, so it tends to pull. I usually bind armholes instead (see Bias Binding).
- You won't need to let the seam out later. The first pass gets trimmed to about 1/8" (3 mm), so the extra allowance is gone for good. Fit the garment first, in a muslin or by basting, and only then commit to French seams.
On sheer fabric the inside is visible from the outside, so the seam finish is part of the design. A serged edge shows through as a fuzzy grey stripe. A French seam shows through as a fine, even line. It's also the right choice for unlined garments that get washed often, like blouses, nightwear and children's clothes, because nothing can fray loose in the machine.
Fitting it into your seam allowance
The finished seamline of a French seam sits at the sum of the two stitching distances, because the second seam is measured from the fold, and the fold is where the first stitching line was. So you split the pattern's allowance between the two passes:
| Pattern seam allowance | First pass (wrong sides together) | Trim first pass to | Second pass (right sides together) |
|---|---|---|---|
| 5/8" (1.5 cm), most US patterns | 1/4" (6 mm) | 1/8" (3 mm) | 3/8" (1 cm) |
| 1/2" (1.25 cm) | 1/4" (6 mm) | scant 1/8" (2-3 mm) | 1/4" (6 mm) |
| 1 cm, many European and indie patterns | 4 mm | 2 mm | 6 mm |
The rule underneath it: the second pass has to be wider than whatever is left of the first allowance after trimming, or the raw edges won't be fully enclosed and threads will poke through to the outside.
If a pattern has no seam allowance included (common in pattern magazines and Japanese pattern books), add 5/8" or 1.5 cm and use the first row of the table.
Step by step
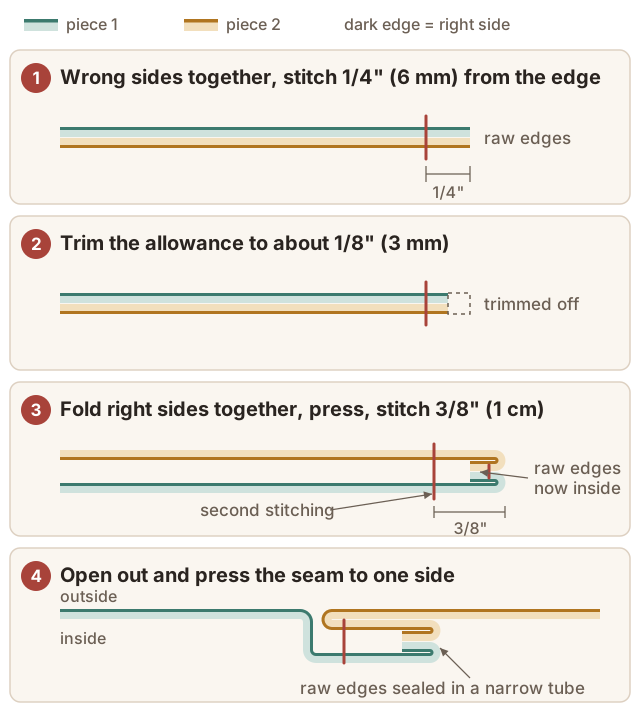
- Pin with wrong sides together. This feels wrong the first few times, because almost every other seam starts with right sides together. Match notches and ends as usual.
- Stitch the first pass. Use the first-pass distance from the table above. For lightweight fabrics I use a stitch length of about 2-2.2 mm and a fine needle: a 60/8 or 70/10 Microtex for silk and polyester sheers, a 70/10 universal for cotton lawn.
- Press the stitching flat, as sewn. This sets the stitches into the fabric and removes small puckers before you trim.
- Trim the allowance. Cut both layers down to about 1/8" (3 mm). On anything that frays heavily, trim a little closer and keep the edge clean. Every stray thread you leave is one that can work its way through the second seam later.
- Press the seam open, then fold. Press the trimmed allowance to one side or open. Then turn the fabric so the right sides are together and the first stitching line sits exactly on the fold. Press the fold hard. A crisp fold is what makes the second pass accurate.
- Stitch the second pass. Sew the second-pass distance from the table, measured from the fold. This line encloses the trimmed edges.
- Check the outside. Before pressing, look along the right side of the seam for any threads poking through. Trim them and restitch slightly wider if needed (see below).
- Press the finished seam to one side. By convention, side seams go toward the back and shoulder seams toward the back.
Fixing the common problems
Whiskers poking through to the right side. This is the most common problem, and it means the trimmed edge was wider than the second seam, or a few threads escaped the trim. Trim the visible whiskers flush, then sew a new second pass about 1/16" (2 mm) further from the fold. On very loose weaves I trim the first pass closer than 1/8" from the start.
Puckered or wavy seams on sheers. Slippery fabrics creep under the presser foot. Shorten the stitch length slightly, hold the fabric gently taut in front of and behind the foot as it feeds (don't pull it through), or stitch over a strip of tissue paper and tear it away afterwards. A straight-stitch needle plate, if your machine has one, stops fine fabric being pushed down into the feed dogs.
The finished seam is too wide or too narrow. You probably measured the second pass from the raw edge instead of the fold, or the first pass wandered. Check the table: the two distances should add up to the pattern's seam allowance.
A lump where two French seams cross. Where a shoulder seam meets a neckline, or a side seam meets a waist seam, press the first French seam firmly to one side and the crossing seam the opposite way, so the bulk doesn't stack. On heavier fabrics, trim the tip of the enclosed tube at an angle where it will be caught in the next seam.
Where French seams get awkward
Zip openings. You can't French seam the part of a seam that holds a zipper. Sew the zipper section with a plain seam and a different finish, such as a Hong Kong finish or a narrow overlock. Then switch to a French seam below the zipper. Leave a clip into the seam allowance at the changeover point so the two halves can lie in different directions.
Pockets in the side seam. In-seam pockets interrupt the side seam in the same way. Finish the pocket bag edges separately, or plan a different seam finish for that garment.
Armholes. A set-in sleeve can be French seamed in lightweight cotton, but the curve doesn't like it. A more reliable option is a plain seam trimmed and finished with a narrow bias binding, or a mock French seam (below).
Variations worth knowing
Mock French seam. Sew an ordinary seam, right sides together. Fold each seam allowance in toward the other so the raw edges meet in the middle, then edgestitch the two folded edges together. It looks similar from the inside, works on curves, and lets you set a seam first and finish it later.
Serged French seam. If you have an overlocker, serge the first pass (wrong sides together) instead of straight-stitching and trimming. Then fold and sew the second pass as usual. There's nothing to trim and the enclosed edge can't fray at all, but the tube ends up slightly thicker, so keep the overlock narrow.
When to use a flat-felled seam instead. If the fabric is a medium-weight shirting or denim, or the garment needs to stand up to hard wear, a flat-felled seam gives the same enclosed finish while lying flatter against the body.