Boning a Bodice
Choosing boning, building channels, placing bones in a strapless or fitted bodice, cutting and capping them - and why a waist stay, not the boning, is what holds a strapless dress up.
Published · Updated

Boning keeps a fitted bodice smooth and upright. Without it, a close-fitting strapless or corseted bodice wrinkles across the midriff and collapses down toward the waist as you move. The bones sit in narrow fabric channels running vertically along the bodice's seams and darts. They don't squeeze the body; they stop the fabric between them from buckling.
One point clears up a lot of frustration: boning does not hold a strapless dress up. What holds it up is a bodice that fits snugly, plus a waist stay, a band of grosgrain ribbon fastened tightly at the waist inside the dress. Boning stops the bodice from wrinkling and creeping down. It can't rescue a bodice that's too loose.
Types of boning
| Type | Bends | Best for | Watch out for |
|---|---|---|---|
| Spiral steel | In every direction | Curved seams: princess lines, side seams of corsets, anywhere over the bust or hip | Must be bought or cut to length and capped with metal tips |
| Flat steel | One direction only, stiff | Straight lines: centre back either side of the lacing or zip, centre front | Doesn't follow curves; too rigid for seams over the bust |
| Synthetic whalebone (plastic) | Flexible, holds a slight curve | Bodices needing moderate support; costume work | Can take a permanent bend from body heat over time |
| Rigilene (woven polyester rods) | Flexible | Light support in evening dresses; can be sewn straight through | Kinks and creases; leaves visible bumps if overused |
For a corset, steel is the only real option. For a strapless evening bodice, spiral steel in the curved seams and flat steel at the back gives the smoothest result. Rigilene is fine for lighter garments, a bodice with straps, or as an extra in a bridesmaid dress that doesn't take much strain.
The Boning materials page goes deeper into widths and buying.
Where the bones go
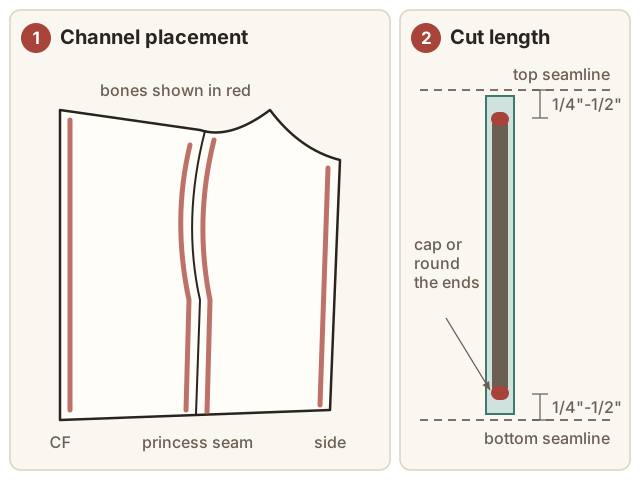
Bones go where the fabric needs to stay vertical and where seams are already under tension:
- Centre front, one bone to keep the front from folding at the middle.
- Each princess seam or front dart, to shape over and under the bust.
- Each side seam.
- Each back seam or back dart, and either side of the centre back closure, so a zip or lacing doesn't wrinkle.
A typical strapless bodice has 8 to 12 bones in total. For more support, add bones on the diagonal from the side seam toward the centre front under the bust, or between seams on wide panels.
Building the channels
There are three common ways to make a channel, and the choice depends on how the bodice is constructed:
- In the seam allowances. Press both seam allowances of a seam to one side and stitch a line through them, parallel to the seam, so the allowances form a tube just wide enough for the bone. This is quick and invisible, and works for princess seams in a lined dress.
- Separate casing on the lining or underlining. Stitch commercial boning casing, twill tape, or a strip of folded fabric to the inner layer along each seamline, stitching down both long edges. This is the usual method for evening dresses, because the outer fabric shows no stitching.
- Between two layers of strong fabric. For corsets, channels are stitched through a layer of coutil (a dense, firm cotton) and a lining. The rows of stitching create the channels, which are sometimes visible on the outside as a design feature.
Whatever the method, size the channel to the bone: just wide enough for it to slide in without forcing, but not loose enough to twist. Test the width with a piece of your boning before stitching every channel.
A bodice that's going to be boned also needs a firm base. Underline the fashion fabric with a stable cotton, coutil, or canvas, or apply a firm fusible interfacing. A boned bodice in unsupported silk will show every bone as a ridge.
Cutting and capping
- Measure each channel from the top seamline to the bottom seamline, not from the cut edges.
- Cut each bone 1/4"-1/2" (6-13 mm) shorter than that at each end, so it stops clear of the seam allowances at the top and the waist. A bone that runs into a seam allowance makes it impossible to sew the seam neatly, and its end pushes against the stitching every time you move.
- Finish every end. Steel bones get metal end tips (U-tips) crimped on with pliers, or are bought precut to length with tips already fitted. Cut plastic bones need every corner rounded with a nail file or sandpaper, and many sewists add a dab of fabric glue or a cover of tape for extra protection. An unfinished end will wear through the channel and the outer fabric, and eventually through the skin underneath.
- Insert each bone into its channel with any curve facing the body.
- Close the channel with a few stitches, or by stitching across the top or bottom seamline.
Adding a waist stay
Cut a length of grosgrain ribbon, about 1" (2.5 cm) wide, to your waist measurement plus about 2" (5 cm). Sew a hook-and-eye closure to the ends so that it fastens snugly at your actual waist. Tack the ribbon to the bodice at the seams and darts along the waistline, leaving the ends free at the zipper. Fasten the waist stay before closing the zipper. The stay takes the strain off the zipper and anchors the whole dress at the narrowest point of the body, which is what keeps a strapless bodice in place.
Troubleshooting
Bones poking through at the top or bottom. The ends weren't capped, or the bones are too long and pressing against the seams. Shorten them and cap them properly.
The bodice slides down. The bodice isn't tight enough at the upper edge, or there's no waist stay. Take in the upper edge and add a waist stay. Adding more boning won't help.
Bones twist inside their channels. The channels are too wide. Restitch them narrower, or use a wider bone.
Ridges or bumps visible on the outside. The fashion fabric isn't underlined, or Rigilene has kinked. Add an underlining layer, and replace kinked Rigilene with spiral steel.
The bodice is stiff but still wrinkles across the front. The bodice doesn't fit closely enough between the bones. Boning only works on a bodice that's already fitted correctly. Go back to the fitting stage (see Fitting and Alterations).